Dialog Description

Content:
- Top Menu
- Ribbon
- Workflow Panel
- Area for Work With Items
- Relations Tab System
- Status Bar
- Change the Item Owner
Top Menu
This is the top ribbon of the window where you have basic icons for the work with the item.
![]()
| Icons | Description |
|---|---|
| Save and Close | Click will save changes and close the current window. |
| Save | Click will save changes and the current window will stay open. |
| Delete | The button is used to remove an item from eWay-CRM, including all relations. |
| Refresh | Click will update the data on a dialog – for example, when a colleague has made some changes to an item while you had the item opened on your PC. All non-saved changes will be lost. The same result can be achieved by pressing F5. |
| Add New Link to Existing |
Buttons are used to make relations between items. More detailed information can be found in the article Relations. |
| New Look |
The button allows you to turn off the modern design of Way-CRM and return to the older one. |
| Form Designer |
Click the button and you can design the dialog as you need - see Form Designer. Right-click the icon and you can manage all your forms. |
| Help |
Click the question mark and the web page with information about the module pops up. |
Item Header
In the upper part of the work window, there are basic information and several buttons which are used for editing.

Features Chat in Teams and Share are available in the module Contacts & Companies (Standard).
| Icons | Description |
|---|---|
| Profile Picture | You can set the photo of the contact, the logo of your customer, well almost any picture you want to make the dialog prettier. |
| Basic Information | Right next to the profile picture, you have basic information about the item so you do not need to find them anywhere else. |
| Add New | The button is used to make a relation with a new item. More detailed information can be found in the article Relations. |
| Link to Existing |
The button is used to make a relation with an existing item. More detailed information can be found in the article Relations. |
| Categorize |
You can categorize items right in its ribbon. Availability: The function is available since eWay-CRM 5.4.2. |
| Send as PDF |
If the item can be exported to a Microsoft Word template, it can be sent as PDF. Just click Send as PDF (or select template if you have more than one). The item will be exported to the PDF file that will be added as an attachment to a new email. Availability: Sending items as PDF is available since eWay-CRM Outlook 5.4.4. |
| Export to Word |
If you have templates for the module, you can export the item to a Microsoft Word file - see Data Export to Microsoft Word. |
| Reports |
The button is a list box and if you click it, the list of reports that can be generated right from the item window will be shown. For more information about reports and their generating from the item window, go to this article. |
| Chat in Teams |
You can start chatting with your colleague(s) and send this item as a link. |
| Share |
You can copy a link to the item or send it as an email. |
|
Click will print the currently displayed item. The application don't print items immediately, it will show you a preview first. |
|
| Private |
The button enables you to lock the item so it can be viewed and edited only by the item owner or users that have relation with this item. If the owner click the button, other users without relation with the item cannot see it. The button remains pushed until the owner click it again, if he want to make the item public. If new item is created from a Private item, the new item automatically gets the Private button activated. You can define who can use Private button in the Column Permissions of the Administration Application where you can set whether the user will be able to use the button, or not. Administrator can limit, on what modules will be Private button available. |
| Other Icons |
Other buttons, such as Edit Team in the Project window or Show Revisions in the Document window, are specific for each module and their functions are described in section Modules. |
Minimize the Ribbon (Only Older eWay-CRM Design)
In the right bottom corner of the ribbon, there is button for its simplified version.

When you click the icon and you are using Microsoft Office 2019 or Microsoft Office 365, ribbon will change to this form:

Availability: Simplified ribbon is available since eWay-CRM 5.3.1 when you are using Microsoft Office 2019.
Workflow Panel
Workflow is a scheme of working on a complex activity (process), which breaks down the activity into simpler activities and their relations. In eWay-CRM this term means a sequence of self-related activities or statuses (phases). Thanks to relating them (creation of transitions) we get an effective tool for leading Projects, processing Documents or approving holiday applications.
The workflow panel is displayed in the item window, below the ribbon. The workflow panel is only displayed in the specific modules (e.g. Marketing, Deals, Projects, Bonuses modules, etc.). It displays in which phase of the working process an item currently is.
![]()
Particular workflow fields (statuses) can gain four different designs (colors):
- Blue background - it is the current status of the item (field is also marked by a flag icon)
- Green background - these are statuses the user can transfer to from the current status (if there is also check icon in the field, item already walked through this status)
- White background with green font - the new status selected by clicking; after saving the item, this clicked status will be new blue one (new current)
- Grey background - you cannot transfer current status to this grey status (if there is lock icon, you cannot move to this status from your current status; if there is check icon in the field, item already walked through this status)
In the Administration Application, the administrator can simply define a workflow or create a new type of item – for example a Project or Document.
Information about the workflow panel for each module can be found in the articles Workflow Panel for Project Module, Workflow Panel for Deal Module, Workflow Panel for Document Module and Workflow Panel for Marketing Module.
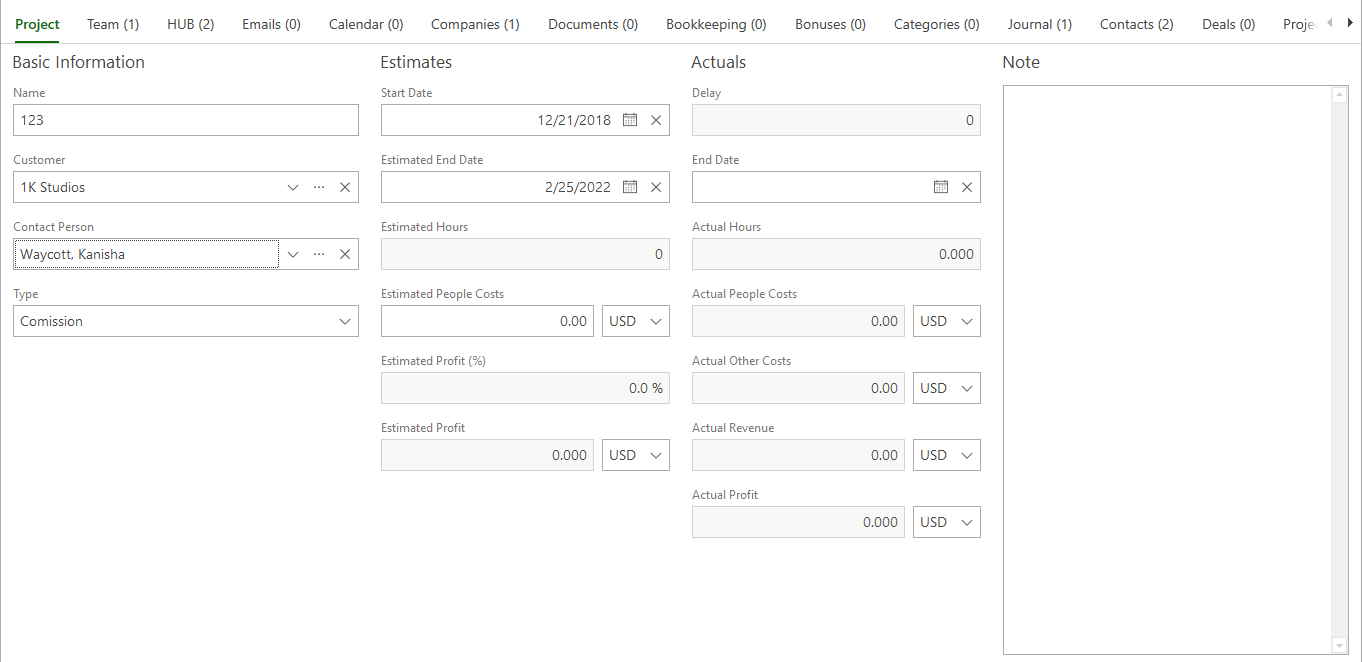
Area for Work With Items
You can enter all details about an item in the area for work with items. Each module window is different in this part and purpose of each field is defined in section Custom Fields. Fields created in this way are displayed in the right corner of the item window in the section User values.
You can use shortcuts in eWay-CRM that are specific for the system and can easily call specific functions.
If the window does not contain the required field for your purposes in the standard form (for example because of filtering and quick searching), you can define own user field in the Administration Application. Your options for user fields can be found in section Custom Fields. Fields created in this way will be displayed in the lower right corner of the item window in the User values section.
Each field of an item can be displayed differently for different users – depending on the level of the user's permission the user can edit a field or just read its content (see Name in the picture below) or cannot see its content at all and the fields are inactive. Information about adjusting the fields of modules is in section Column Permissions.
The Note field can be edited which is described in the Note Field article.
Relation Boxes Buttons and Their Usage
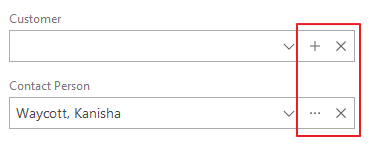
Fields you can use for creating a relation, e.g. Superior Project, etc. as you can see in the picture above, contains the "+" and "..." signs.
The "+" button is used for creating a new item. It means you are not selecting from existing items, but creating a new one, for example a project. If this button is clicked on within a box, where several types of item can be selected, you will be asked for the type you intend to create.
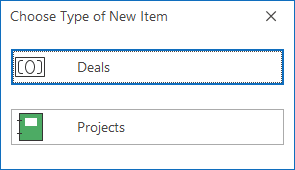
In the case that you can add not only one type of item by clicking the + sign, you will see the dialog below where you can select what type of item you want to add. Just click the item you want to add.
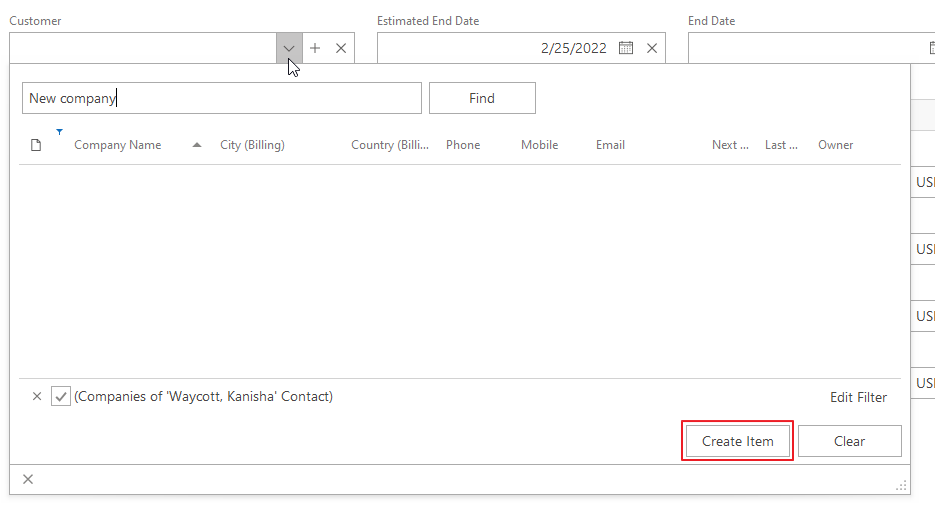
If you want to add relation to new item, you can do it right in the relation list that appears when you click the relation field. In the list, just type name (e.g. company) into the search field. If there is no result in the list, you can click Create Item button. If so, new item window appears and search string is in the Name field. After save, the relation in the field is created.
Availability: The Create Item button in the relation field is available since eWay-CRM 6.0.2.
The "..." button gives you an option for opening the item window of the prefilled item. For example, when you choose a superior project, by clicking this button you will open it in its own Project window.
The "X" button can be generally used for cancelling an item you added to the field as a relation. Then, you can add a new item or just leave the box blank.
Background Color of Fields
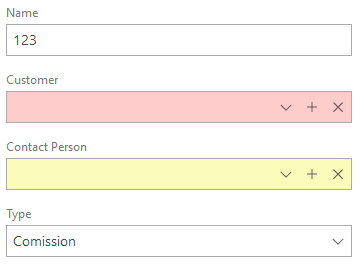
Fields in the item window can have these colors:
- Red: A mandatory or unique field must be filled. If the field is empty, the item cannot be saved.
- Yellow: An optional field should be filled. If the field remains empty, you will be asked during saving process, whether you want to save the item with an empty optional field.
- White: Already filled fields or empty fields that needn't be filled.
The setting, whether the field is optional, mandatory or non-mandatory, can be done through column permissions or during the workflow status setting (Completion Level in the workflow definition of the Check Presence of Relation, Database Field Is Not Empty, or Are Equal actions). Some fields are mandatory by default.
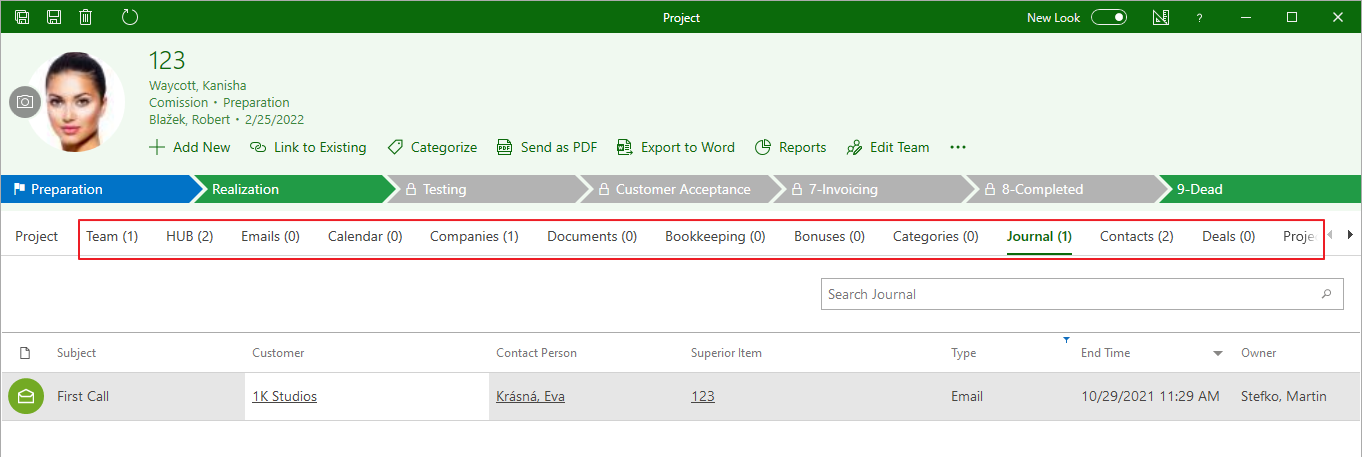
Relations Tab System
In the lower part of the window for working with an item there is a tab system, that is dividing the area for working with items from relation tab system. If you click and move the splitter, you can change the size of the space that is meant for working with values and with tabs. Tab order is not fixed, you can drag and drop tabs in what order you want to make it efficient for you. You can easily and precisely set your window for the best and most efficient work.
Each tab represents a module of the system. Items within the tabs can be described as relations, linking currently opened item to other items within the system. If you delete information from a tab, you will only delete the link between the opened item and the referenced one, not the item itself. In this way, you can monitor time sheets and communication in the Projects and Deals modules; or in Company you can see all the contacts, not just one contact person. Relations can be created via the Link to Existing button and Add New button on the ribbon or via the context menu outside of the item (see below).
There are also two specific tabs in the tab system:
- History - list of all changes done on the item, see History.
- Custom Fields - all custom fields you created for the module, see the article about adding your own custom fields.
Context Menu Within Item
You can work with data in the relations tabs. Right-clicking an item will display its context menu. Context menu and work with it are similar as in main lists.
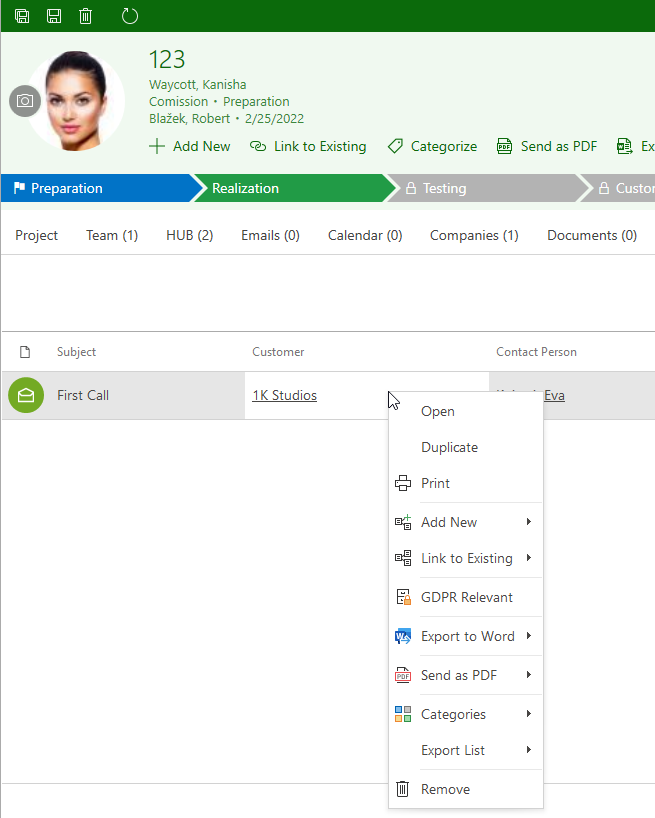
Context Menu Outside the Item
Right-clicking the empty space outside of the items list will bring up a context menu for the entire module. Thanks to this menu, you can simply add relation to existing or new item, which you will create. You also can print all items (Print). All items can be also exported to an XML or XLS (Microsoft Excel) file (Export list).
Options Print and Export List are available only in the case that the tab list contains at least one item. If there is no item, those options are unavailable.
A special tab in the Project window is Teams – details can be found in the chapter Teams.
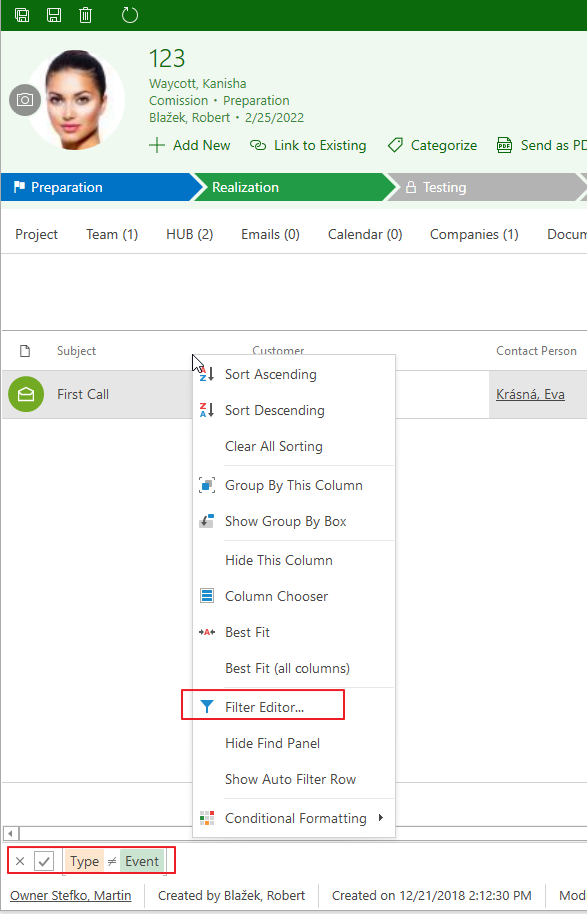
Filet Items in the Tab System
You can also use quick search feature in the tab system of all windows. Just right-click the first empty row and enter value for to quick search among items. It is also possible to use Filter Editor to define more complex search queries, just click the heading of any column in open tab and choose Filter Editor. Fill in query for filtering and apply it. For more information about filtering, go to Filter Items. After filter is applied, the string will be shown in the bottom part of the tab (as in the picture below).
Status Bar
In the lowest part of the window there is a status bar. On the status bar are data about the item owner, when and which user created the item and when and which user changed it most recently. In addition to the information about the item owner, there are data which are purely informative and cannot be changed.
![]()
Change the Item Owner
This function gives the option to change the ownership of an item. In practice it may be used to transfer the responsibility for a project to another person.
Requirements for Owner Change
It can happen that Edit (see below) option is inactive (disabled). You need to be sure that permissions are correctly set:
- User have permissions to edit item where he or she wants to change the owner.
- The edit module permission must be higher than Only My Items.
- User has column permissions for Owner field.
Process of Owner Change
- On the status bar of an item which you want to change, left-click the item owner and select Edit.
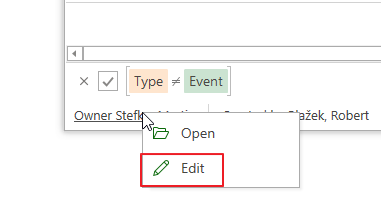
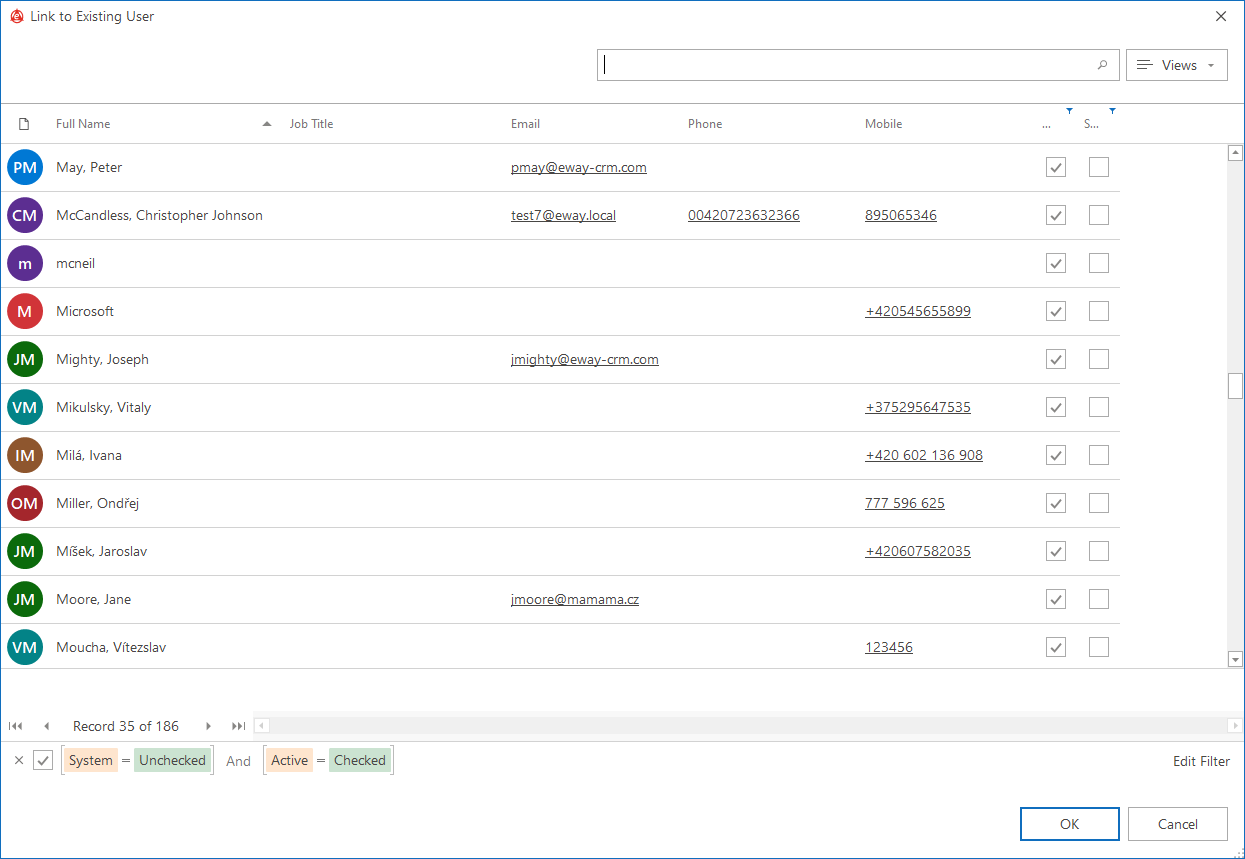
- When the dialog window Link to Existing User items appears, select a User who will assume ownership of the item and accept with OK.