Resource Plan (Description and Use of View)
A project in your eWay-CRM can be viewed in a standard list or in a regime called Resource Plan. This Resource Plan primarily serves as a space for planning the number of hours each user spends weekly on projects. This plan is compared to the actual worked hours.
Prerequisites
The user must have permission on the Resource Plan module to be able to use it.
Resource Plan
Clicking the Project icon of the eWay-CRM Desktop main toolbar will display two new buttons called Current View. These buttons (icons) are List and Resource Plan (see below). The List button is usually pressed because List is the default view for module Projects. If you want to view your projects as a Resource Plan, you need to click the Resource Plan icon. This icon stays pressed and eWay-CRM Desktop will remember your choice until you change it.

Resource Plan is being displayed as a list of projects that have defined team - members of this team are listed in the Team column. The way of working with the Resource Plan is similar to with other main lists, for example, if you want to view other columns than basic ones, you can use your own column setting. You also can easily show only not completed projects, if you use correctly set filters. These views defined by the user can be saved and then used for switching between the views in just two clicks.
You can manually add work hours to each user to the week columns (the first one is the current week). These are the hours you plan for the user to work on the project in that week. If the values entered are red it means that the sum of all user's allocated hours in the week in Resource Plan is higher than the number of work hours in Work Commitments for this user. It is up to your agreement with the employee whether he/she will work extra hours or you edit the plan to not overload the user. The black values mean that the sum of all allocated hours is lower than or equal to the user's work commitments.
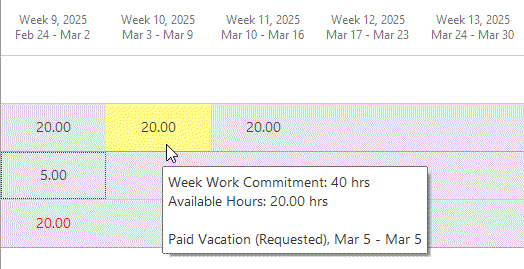
The eWay-CRM system automatically adds a gray color to the background of those weeks the project is planned for (the Estimated end field is filled in the Project window). The yellow background is used for weeks when the user has leave (e.g. paid vacation). Number of leave days is not included in the allocated hours.
How to Allocate Workload
Resources Planning Type setting gives you the option to select the method of allocating hours for users on projects. Options are:
- Manually Entered Hours
- Workload Entered by Using Calendar
You can use only one possibility at a time.
Manually Entered Hours
You don't want to fill in same number of hours again and again? You can use copying of values (Ctrl+C and Ctrl+V), or if it is a project with the Estimated end field filled and this is in the future, you can fill in the value in just one field and then automatically allocate for other weeks. Right-click this value and the context menu with the Allocate This Workload for the Rest Duration of Project option will appear. If you select this option, the value you filled in will be copied to all fields to the week that is the end of the project. It is easier than filling all fields one by one if you know that the workload of a user is fixed.

Workload Entered by Using Calendar
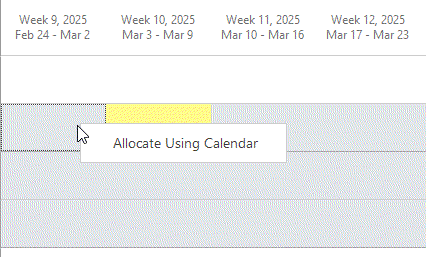
If you select Using Calendar in the Resources Planning Type setting, the Resource Plan will look the same, but when you right-click any week field, you will see a new option - Allocate Using Calendar:
- If you allocate for your user, you will see a standard calendar window.
- If you allocate for another user, the email address of the user will be automatically prefilled and you can send the event right to him or her.

The opened calendar window has prefilled some values (except Superior Item, you can change all of them):
- Category is set as eWay-CRM (Resource Plan) - you can set that you do not want to see these events in your calendar in Outlook.
- Superior Item is the selected project.
- The day is the first they of the selected week.
- Start time is based on Work Start Time on User Detail.
- End time is set due to the Work Time Per Day setting.
When you fill in all values and save or send the event, the amount of hours will be seen in the Resource Plan. The event is also on the user's calendar in Outlook, and you can see it in the Calendar tab of the user and the project.
Hour Field Tooltip
It is a tooltip that will appear if you move over any numeric value in the Resource Plan table. This tooltip shows weekly work commitment and available hours you can still use for planning the user's work week. If the mouse hovers over the yellow field (the user has leave in this week), the tooltip also shows the date and the type of leave.

Association With the Project Window
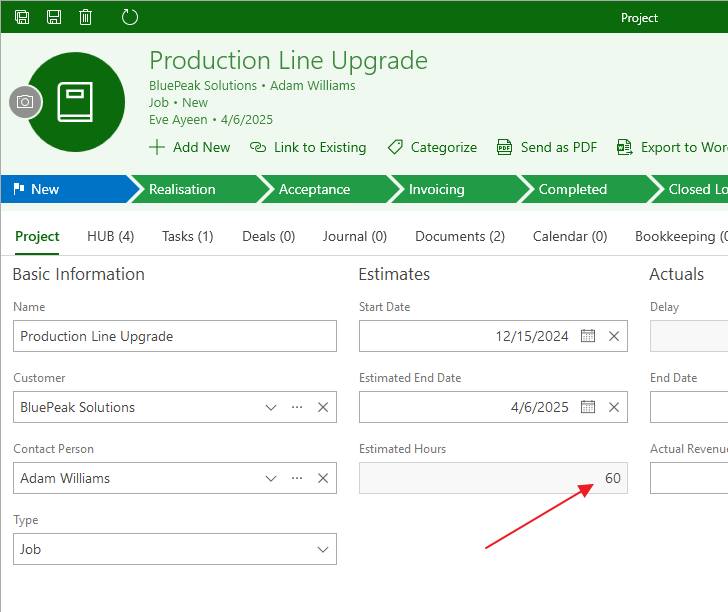
The association of the Project window is in the fact that all hours that were added to all team members are displayed (as a sum) in the Estimated Hours field. This value can be compared to Actual Hours that are counted from time sheets that were related to the project.
The Actual Hours field is filled with actual hours only in the case that you are inserting hours to Resource Pan manually. If you are using calendars, the Actual Hours is filled with 0.

The Estimated Hours field is not visible in the dialog by default; you need to add it through the Create Custom Forms.
