Integrate Marketing Module With Professional Email Service
Description of functions that Professional Email offers, a short setup wizard describing integration with the marketing module of eWay-CRM system.
The article contains:
- What Is Professional Email?
- Activate Professional Email in eWay-CRM
- Create Marketing Campaign
- Select Template
- Message Preparation
- Campaign Settings
- Schedule Campaign
- Change Monthly Subscription
- Difference Between Number of Contacts and Sent Emails
- Basic Marketing Results
- Advanced Marketing Results
- Synchronize Custom Fields
What Is Professional Email?
This marketing service specializes in creating and sending mass emails, and email campaigns - your newsletters, Christmas cards, or special announcements. Thanks to a sophisticated campaign editor you can easily create professional-looking emails. Professional Email allows you to create and reuse templates, and insert attachments and inline images, and it also has a system for monitoring reactions and campaign evaluation.
When creating a new marketing campaign in eWay-CRM, choose the Type Professional Email, and you will be able to use the Professional Email tools instead of a mail merge in MS Word.
Activate Professional Email in eWay-CRM
To start deriving benefits from Professional Email, it is necessary to activate it. Straight from the eWay-CRM settings you can log in to your existing account (if you have previously used Professional Email) or register as a new user. To log in to an existing account fill Professional Email Account in the Global Settings section in the Administration Center.
A new account is created automatically before the campaign wizard is displayed for the first time. The account is created with a basic credit, so you can test all the functions.
Create Marketing Campaign
Once the connection to Professional Email is active, choose the Type Professional Email when creating a new Marketing Campaign and then you can work with the campaign as you are used to.
First, you need to create a marketing list using the Edit Marketing List button (it gets activated when the campaign is saved). Although the campaign type Professional Email has its workflow defined, statuses cannot be manually changed, the transition between them is automated and dependent on the actions you perform on the campaign or the progress during the processing campaign on the server of the service provider. After sending the campaign marketing list cannot be edited anymore.
Most Important Is Your Data
Before launching the campaign, the user needs to select the addresses the campaign should be directed. With the amount of data about communication history, inquiries, and records of the underlying contracts with your contacts, you can create quite complex queries for selecting recipients. It is always necessary for this step, to proceed with maximum caution, you certainly will not want to offer a 20% discount on a new model of Ford Mustang, which the customer bought just last week without any discount. On the contrary, interesting offers from additional services may please him. Of course, in some cases, your message should reach all your contacts - whether existing ones, kept in the Contacts module and Companies, or even the potential, led-in module Deals. We can filter contacts and the final condition for selection may look for example as follows:
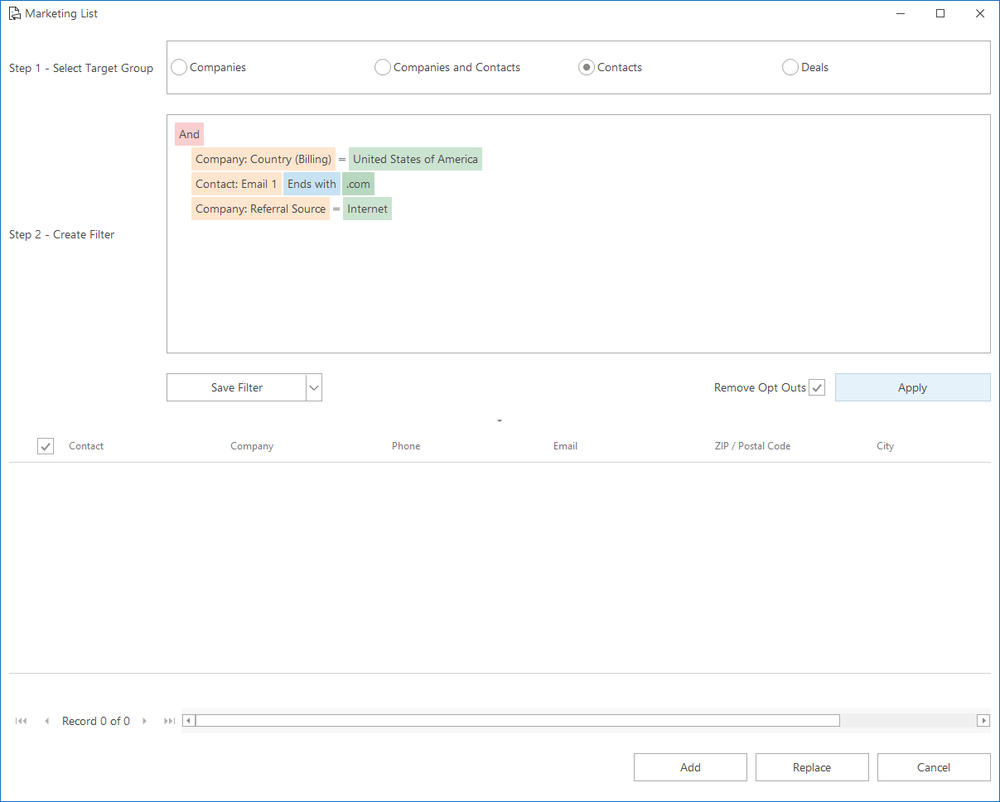
Important: Some email addresses can be twice in the marketing list: for example, more contacts use the same company email address. Professional email recognizes it and no matter how many times is one email address in the marketing list, an email with the campaign is sent only once to his address.
eWay-CRM provides a function for saving filters, so you need to create such a complicated query just once and then you can save it for next time using the Save Filter button. To learn how to work with Filter editor and data sources, see the separate article Create and Edit Marketing List.
Fields on Contact Used in Marketing Campaigns
Professional email uses these fields on contact for marketing campaigns and their correct results:
- Name
- Surname
- Email address
- Company
- Phone
- Street
- ZIP
- City
Select Template
The message can be created in a simple wizard that appears when you press the Action button and select Send Bulk Email. This option is active only if you have a Marketing List already defined and simultaneously, the marketing campaign has not been sent yet.
The first dialog allows you to select a predefined template you want to use for your campaign. You can also use your template or order one. If you already used, edited, and sent some templates, you see them in the tab of previously used templates.
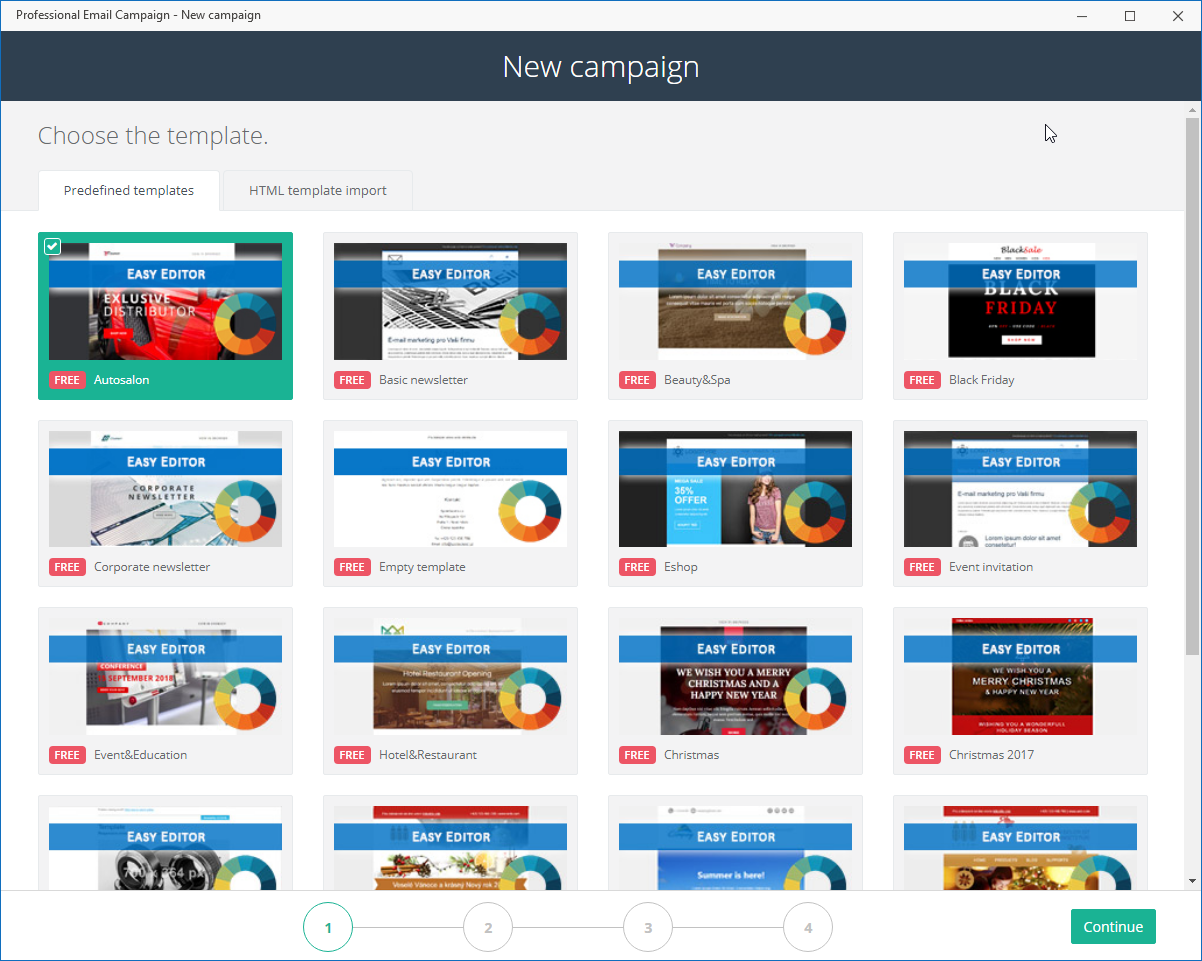
If you selected a suitable template, click Continue.
Message Preparation
The most important part is the message. There is an HTML editor, which allows you to build a professional message. You can easily drag and drop predefined blocks and edit them as you need.

Now, there are substitute symbols that are kind of variables. They allow you to put specific values by inserting a general symbol. When you click the Substitute symbol in the toolbar you will see default substitute symbols that are available. The general string will be substituted by a specific value when the email is sent based on the recipient and his or her specifics - for example will salute the recipient and write his or her name like: "Dear John Smith".

If you want to insert the correct salutation based on gender, click Salutation in the left panel, Settings tab. Here you can insert salutations, for women, men, or neutral ones.
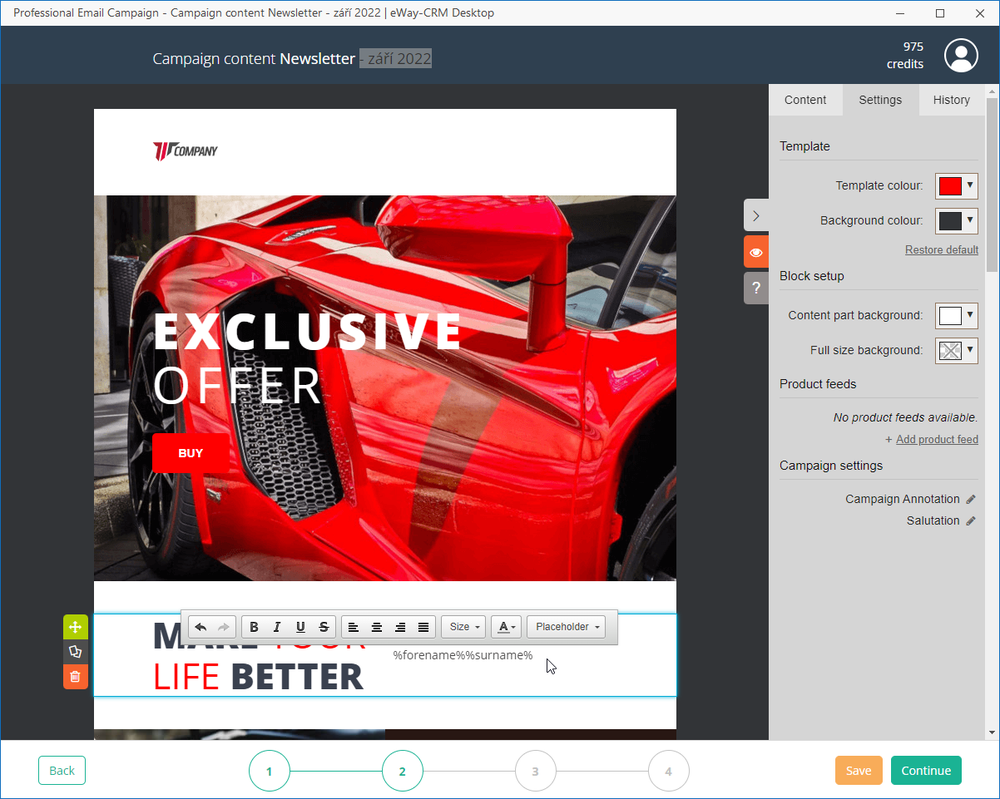
Once you are satisfied with the appearance of your message and want to continue sending the campaign, use one of the buttons Save and Continue that are displayed both at the top and bottom of the page.
If you currently don't have enough time to complete a subsequently distribute the campaign, you can save the draft by clicking on the Save and Continue button, and then you can safely leave the wizard. From now on, you will be always able to return to the draft from the window of the marketing campaign via the Actions > Send Bulk Email.
Campaign Settings
The next step allows you to set the name and email address of a sender, and email subject and you can attach some files.

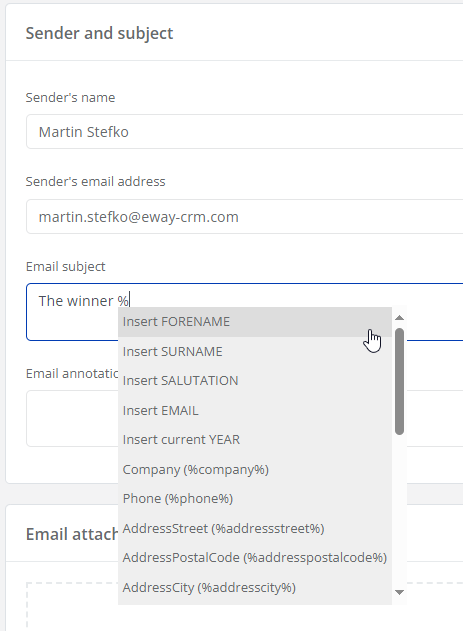
For the Email subject, you can use substitute symbols as described above. Just type in % and you will see the list of available substitute symbols.
If this step, you can experience this warning:

If so, an email was sent to the email address you filled in the Sender Email field. This email is sent because the service needs to verify that the email address exists and is yours. Just click a link in the verification email and go on with creating your campaign. When you confirm your email address once, there is no need to do it again.
Attachments
If attachments other than images (that can be inserted directly into the body of the email) are needed, you can do so here via Select file. Select any attachment you wish. Just remember that the executable attachment types (.exe, .reg, and similar) can be detected as spam and for this reason, email may not be delivered to the recipient.
Schedule Campaign
In the last dialog, check and plan the campaign.

If you would like to have a look at your message before sending you can use the Test email tab where you can send a test email to yourself.
Scheduled Sending
It may happen that the campaign is being prepared in advance and its distribution should happen somewhere in the future. Box Send date allows you to adjust the date and time of dispatch. The last few digits (-0400 in the picture above) indicate the time zone is UTC / GMT which is set by the time zone setting of the user's computer.
Smart Delivery
Based on a vast amount of data such as days and hours when emails are opened, clicks, holidays, and other data that are not primarily related to marketing campaigns (e.g. current weather or time zone) Professional email will decide when emails will be sent to users for its best efficiency. You just set a period when emails should be sent. For the best function of Smart Delivery, it is best to set a longer range than just a few hours, the best results are in days.

Email Check
The Links and SPAM Checker section gives you the score of your links and spam. Click the View details to see the check table.

You can see whether links in your email campaign are valid - The status is green or red. You can also see the information if there is no sense in the tracking clicks of this link.
The table shows whether your campaign does not contain some parts that can be evaluated as spam. If everything is in order, you can send your campaign.
Track CTR
If you have inserted some links that the user is allowed to click, it is advisable to turn the Click tracking option on. Among responses to the campaign will then be clear who viewed what link from the message.
Google Analytics
By checking the box Use Google Analytics and filling in the appropriate fields you get a tool to collect more information about your referral traffic. The following table describes the parameters that Professional Email allows. A description of all parameters and recommendations for the use of the Custom campaign is to be found in Help for Google Analytics.
| Name in Professional Email | Parameter name in Google Analytics | Required | Description |
|---|---|---|---|
| Source | Campaign Source (utm_source) | Yes | Identify the advertiser, site, publication, etc. that is sending traffic to your property, e.g. google, citysearch, newsletter4, billboard. Example: utm_source=professional_email |
| Campaign | Campaign Name (utm_campaign) | Recommended |
Used for keyword analysis. The individual campaign name, slogan, promo code, etc. for a product. |
| Medium | Campaign Medium (utm_medium) | Yes | Used to identify a medium such as email or cost-per-click. Example: utm_medium=email |
Unsubscribe Reasons
We recommend activating unsubscribe reasons. They can provide you with an insight into how users behave or what could be improved on your side. You define unsubscribe reasons by yourself, and users if they choose to sign off, may select one of the options you set for them.
Change Monthly Subscription
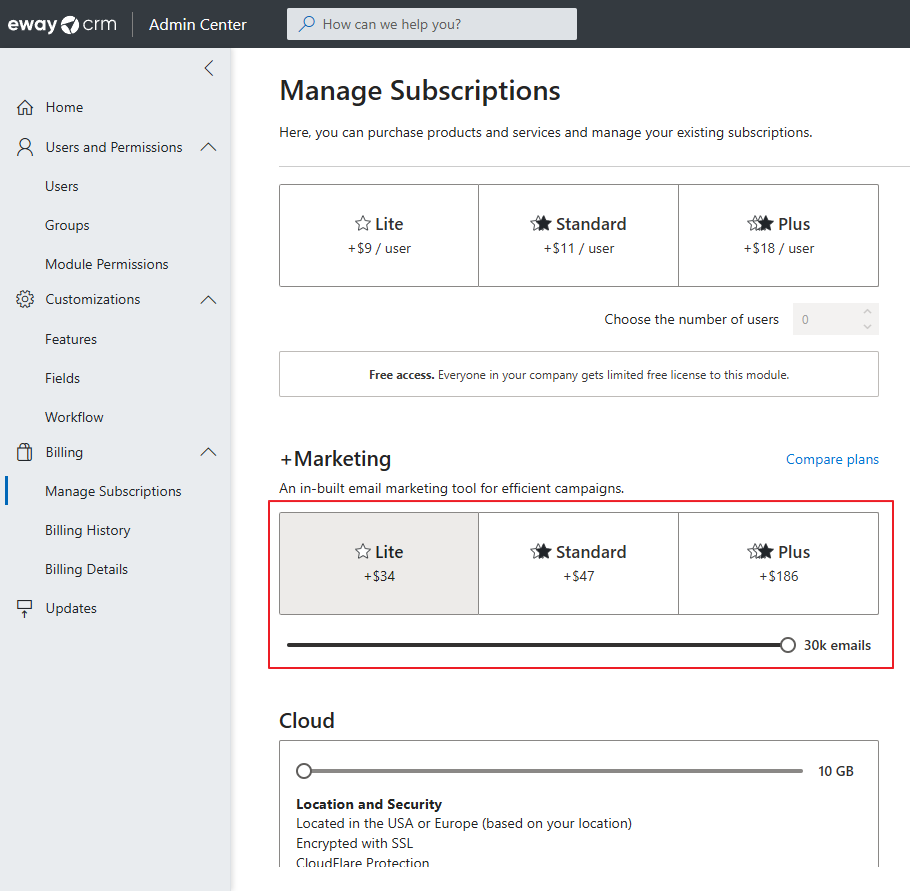
If you are using Professional Email, you have a package of prepaid emails you can send in a month. If this amount is not enough for you, you can always change it:
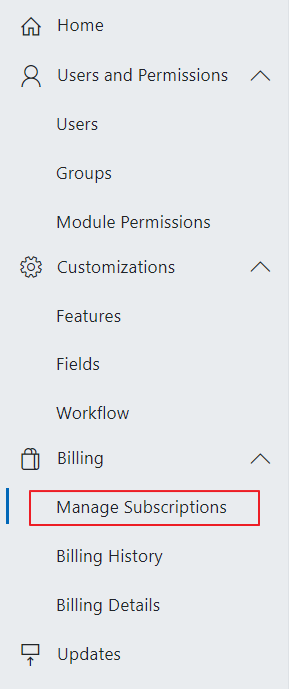
- Go to the Administration Center.

- Click Manage Subscriptions.
- Select what Marketing license you need based on the number of emails you are sending.
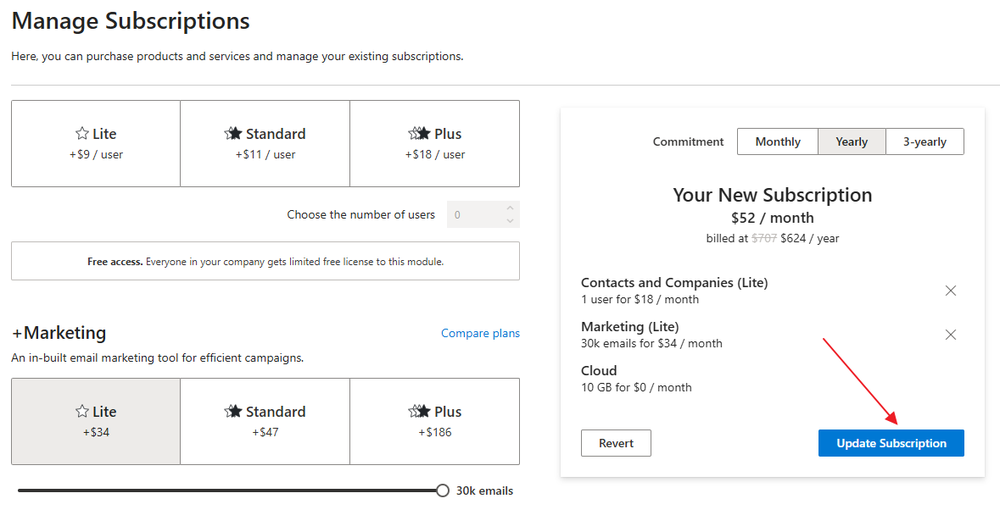
- Then, just click Update Subscription and proceed with the payment.
Difference Between Number of Contacts and Sent Emails
When you are sending a marketing campaign, there can be a difference between the number of contacts and the number of really sent emails - the second number is lower. What is the reason for this difference?
There is a syntax validation during the importing process from eWay-CRM to Emailcampaigns – all nonvalid e-mail addresses as refused. This is the first part of "loss".
Before sending the campaign there is a list-check to compare known non-deliverable addresses to your current list (e.g. spam traps, permanent errors like "mailbox does not exist" etc.). These addresses are extracted from the list which represents the second part of the "loss". This should be the final number of emails sent to your contacts.
This all is done to prevent blacklisting your domain and is a prevention to be marked as a "spammer".
Basic Marketing Results
From our experience, it pays off to wait for the feedback for 2-3 workdays. After that, new information shows up slowly and it has no impact on final statistics.
The important information is displayed on the Campaign window in eWay-CRM Desktop, where the marketer finds quite a range of details represented as the aggregate statistics, as shown in the preview below. For a detailed explanation of each field see the article Marketing Module Introduction.
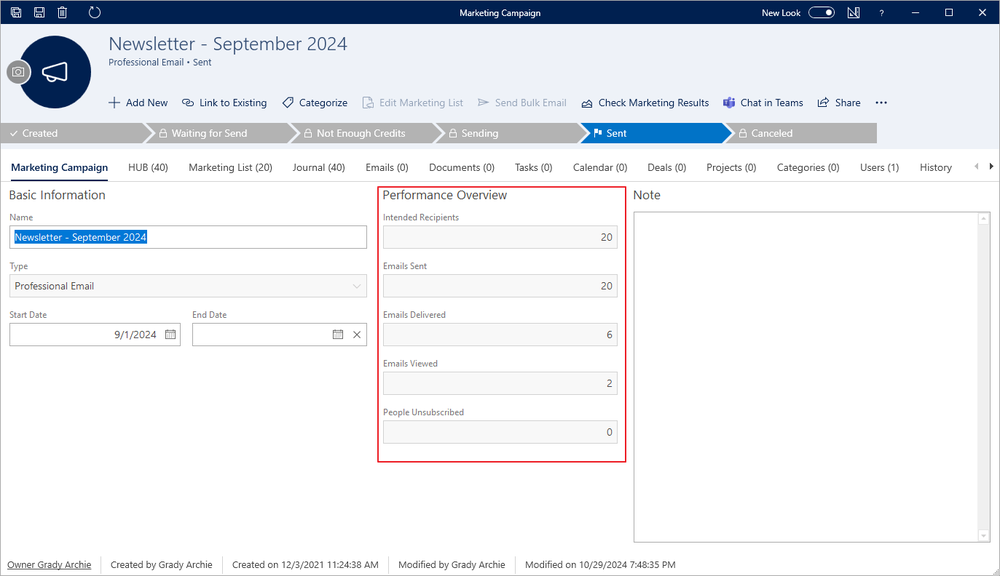
According to these statistics, the campaign aimed at 4 respondents, and an email was sent to all of them. The system automatically eliminates duplicates in addresses or incorrect format. So far, 4 people read it and 2 of them checked out. Additional details on these summarized statistics can be found in the Journal tab of the campaign, where the responses are the basis for the calculation of grossed statistics. Using Professional Email Response Types, you can set what type of responses will be downloaded.
Responses are automatically downloaded every five minutes. Because first feedback can be enormous, it is recommended not to download responses manually, but to let it run automatically - this option is not such a burden for synchronization. The interval is gradually prolonged and is set to stop automatic response downloads when the week after the campaign starts is reached. The intervals are set to the marketing specialists' statement that receivers would decide to respond in a week or less. You will not experience a long wait while a lot of data is downloaded because the process is sequential. In the need, you are always able to download new responses manually, but in this case, the download is limited to 100 responses at a time to avoid unnecessary synchronization overload when creating journals.
Working with journals of Responses type is like with any other list in the eWay-CRM. The data can be grouped and filtered as needed. As you can see in the picture below, the Subject takes different values:
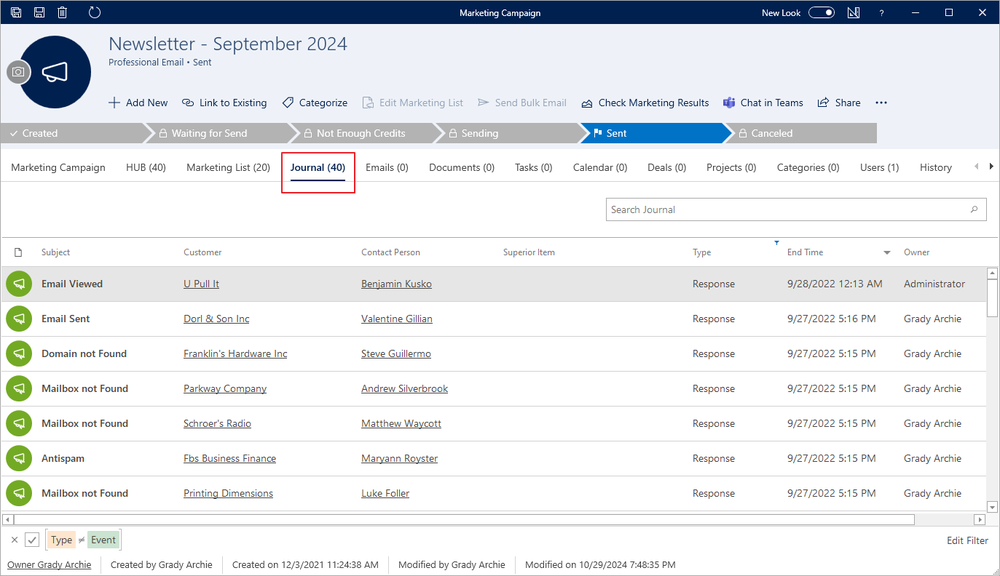
Types of reactions
- Email Sent is created just as you send a campaign. The start/end date represents the sent time.
- Email Delivered will be created for all recipients who didn't come to any other answer (such as Mailbox not found). The start/end date represents the sent time.
- Mailbox Not Found / Domain Not Found / Mailbox Full / Antispam / Message Size Limit Exceeded / Temporary Error / Permanent Problem With Delivery - one of these errors occurred while delivering the message. The start/end date represents the sent time.
- Email Viewed - The user opened the email, the important is that texts and pictures of the email were loaded on the user's account. The start/end date represents the email's last view time.
- Email Link Opened - created when the addressee clicks on any of the links that the message contains. In the Note column is specified which of the links is the information related to. The start/end date represents the time when the link was opened.
- Marked as SPAM - when the recipient moves your email to the SPAM folder. Supported only by some mail providers. The start/end date represents a time when the email was marked as SPAM.
- Unsubscribed - if you have filled Logout reasons, the respondent may choose one of the options. The reason will be specified after a hyphen in the title of a reaction. The start/end date represents the time when the user unsubscribed.
There is also a report Marketing Results that displays data from the Professional Email in an attractive and lucid form. Marketing managers will learn, for example, why most people log out or on what days people read your messages the most.
Advanced Marketing Results
Detailed and visual statistics can be found in the sent campaign when you click Check Marketing Results in the campaign window.

Or you just right-click the selected campaign in the list and click Check Marketing Results:
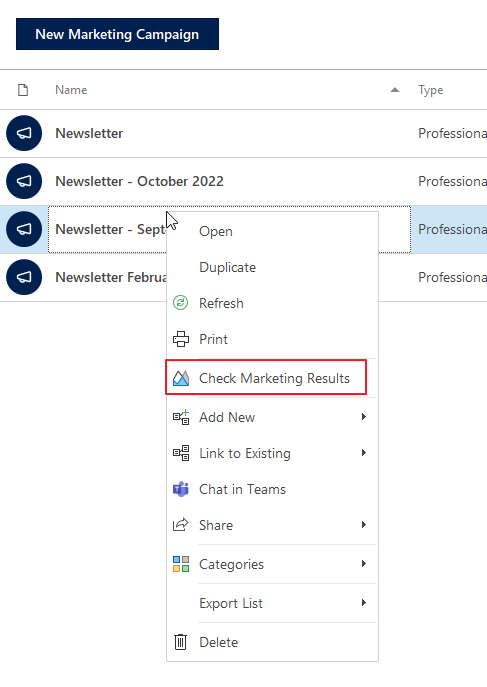
After clicking the button, you can review your campaign in charts and tables where there is maximum information for you.

The first chart shows how your emails are successful - how many of them were opened.

The second chart shows issues that were related to deliverance - undelivered, unsubscribed, etc.

The next table provides a complete overview of your campaign in numbers. You can see delivery rate, open rate, etc.
Description of some rates:
- Unique Open Rate - number of users who opened email no matter how many times (each user is calculated only once)
- Open Rate - the total amount of email openings
- Clicks After View - number of users who clicked a link in the email no matter how many times (each user is calculated only once)
- Total Clicks - the total amount of clicking on a link in the email

In this section, you can also click View heatmap (see the arrow in the picture above). You will see the email you sent to your customers where you have numbers of how many times receivers clicked on links in the message.

The map shows where your recipients are from.

The next chart shows the timeline with views, clicks, and unsubscriptions.

The last chart specifies the devices the recipient used for opening your email. Due to this function, you can focus, for example, more on mobile campaigns.

Synchronize Custom Fields
Relation and Multi Select Drop Down fields are not supported for this function.
Professional Email allows you to share custom fields that you created in eWay-CRM and you can have them in your campaign contacts. For this purpose, you need to have a custom field created for the Marketing List module. This custom field can be added in the Administration Center > Fields section. You need to click the Marketing module and add the field you want to share in your marketing campaigns.

For the next steps, you need to know the database name of your custom field - it is highlighted in the picture above. In this case, the name is af_947 (your custom field would have a different number but it will start with the "af_" prefix).
If you want to connect modules, so values from custom fields on Contact will be inserted into fields of the new Marketing List, there is a need to have the same Field Name and Type of field on both modules - Marketing List and Contacts (or Companies or Deals or Projects). For example, if the field name of the custom field on the Marketing List is "Customer Login Date" and the type is Date, the name of the field on the contacts module must be "Customer Login Date" and the type must be Date too. If you want to put the value from a default field or a field that is not part of the marketing list source, there is a need to create a new data source and return the value under the column that is named Result_af_XXX where XXX is the number of custom fields in the Marketing List module.
If you want to add this field to Professional Email, you need to go to Emailkampane.cz (provider of the service) where you log in to administration using the same credentials as you used for your Professional Email service - see Professional Email Account.
If you successfully log in to web administration, you will see a page where you click Contacts:

Select Attribute settings on a new page:

Then, click the New attribute button:

You need to fill in values for the Attribute name and Import name fields. The important field is the Import name where you need to insert the database name of your custom field, e.g. af_947 as in our case.

Custom fields can be seen and filled when you create a new contact in web administration on Emailkampane.cz or when you edit the contact. The value will be displayed like this in the contact detail:

