Time Sheets Module Introduction
Time Sheets module gives users the opportunity to record the time they spent working on a specific project or deal, including a description of specific activities. You can create workflows for different types of time sheet so you can better categorize your time sheets.
The employer has a perfect overview of both his employees' work and the project or deal process. It is easy to charge the customer for the work that has been done, thanks to the Time Sheets module.
Each report or entire time sheet for a selected term, customer, user, or project can be found in the Reports module in eWay-CRM Desktop (see section Reports).
Time Sheets List
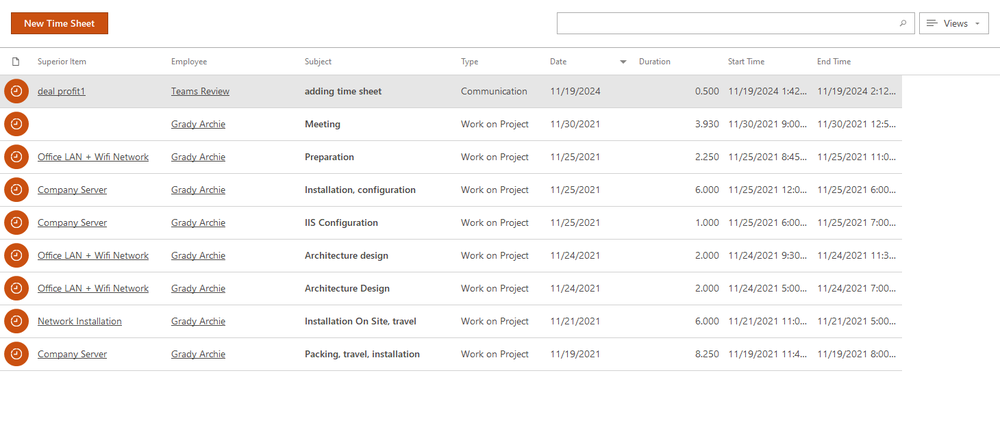
Clicking the Time Sheets button on the eWay-CRM Desktop toolbar will bring up a list of the time sheets stored in the system. If you wish to adjust the list view and you want to display the data that interests you, you should take a look at the section Main List, where you will find general information about working with the main list.

The Time Sheet module allows you to edit some values right in the list. For more information, go to Edit Items From List and Bulk Edit.
Time Sheets Management
If you have the appropriate permissions, you can perform the following actions:
- Create a new time sheet – detailed information about item creation can be found in the chapter: Create New Items.
- Edit time sheet – detailed information about editing can be found in the chapter: Edit Items.
- Item removal – there are several ways to remove an item. They are described in the chapter: Remove Items
Time Sheet Window
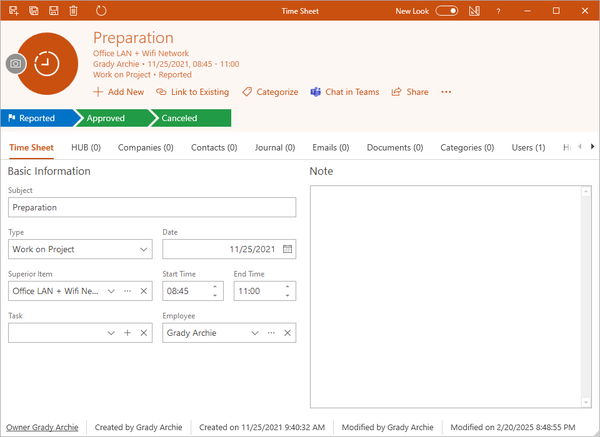
Double-clicking a selected time sheet will bring up its working window. The Time Sheet window, without pre-filled data, will appear when creating a new time sheet – and it’s up to you to enter all the necessary data.

| Subject | The description of the activity that the user did. |
| Type | The type of activity specifies the item and makes the orientation in the list easier. |
| Superior Item | An item that the time sheet is related with. For example: If you are creating a time sheet right in the Project window by Add New > Time Sheet, the project will be automatically filled in. If you are creating a new time sheet from the eWay-CRM toolbar, you have to choose a superior item manually. |
| Task | You can relate time sheet with a task you work on during your work time. |
| Date and Time |
The user specifies the date and time he or she did the work activity. The Start Time field is prefilled with a value that is set for the user in its card (in Administration Center) in the Advanced tab - see User Card. |
| Employee | The name of the user who is logged in to the system. |
| Note |
Any text you want to add to a time sheet. For more information about the field, see Note Field. |
In the Time Sheet window is a new Save and New button, which is situated next to Save and Close and Save on the toolbar. You can save and close the current report by clicking the Save and New button and a new time sheet window will open simultaneously. It is simple in the case you insert a couple of different time sheets (you work on more projects during a day, forget to insert your report last day, etc.). Based on your settings, the user may have permission to input its time sheet only, for example, for two last days or only for incomplete projects. This could be set in the Global Settings.
Other general information about the working window can be found in the section Item Dialog.
Workflow Panel in the Time Sheet Window
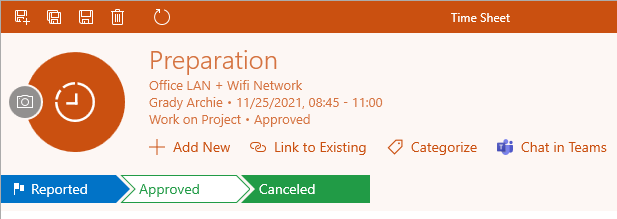
In the top part of the Time Sheet window, there is the workflow panel. Steps of the workflow depend on the Time Sheet type - setting the types and their workflows can be done in the Administration Center in eWay-CRM Desktop.

It is possible, for example, to have three steps in a workflow pre-defined and be sure that users know how to manage the time sheet. During the change of Status, the system can check whether some values (e.g. Start Time and End Time) are filled, etc.
eWay-CRM enables automatic notification of User groups or individual users, so for example, the supervisor knows that the new time sheet was created.
For more information, go to the chapter Dialog Description.
