Users (Create and Manage)
Availability: New Administration Center is available since eWay-CRM 6.0.0.
Administration Center allows complete overview about users and their management that is essential part of correct and efficient working of eWay-CRM in your company.
Article contains:
- Work With Users List
- Add New User
- Edit User
- Reassign Licenses
- Reset Password
- Force Password Change
- Add to Groups
- Delegate Agenda
- Effective Permissions
- Deactivate or Re-activate the User
- Unlock Account
Users can be found in the left menu of the Administration Center.
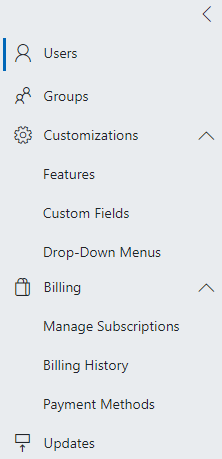
If you click Users, you will see the list of all users that are currently created in eWay-CRM:
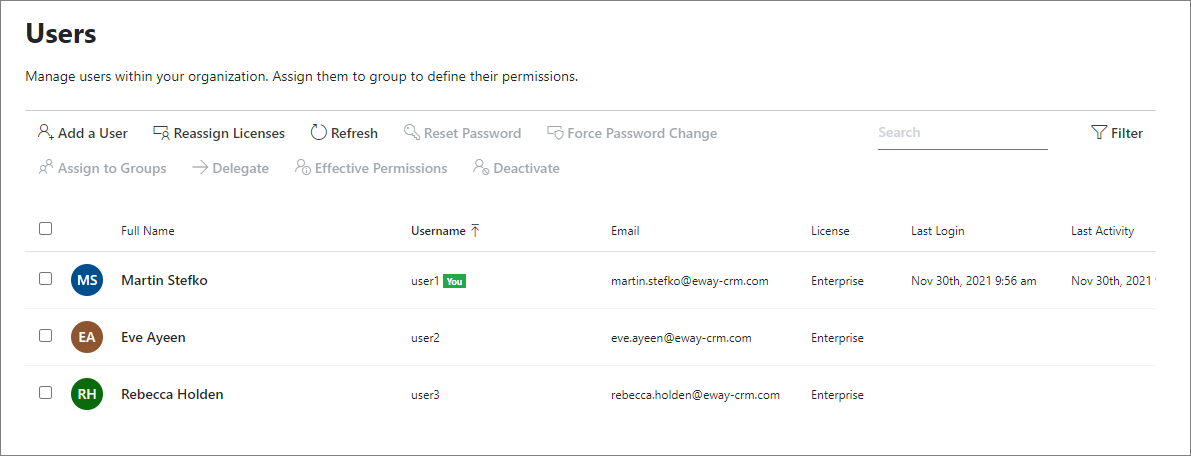
Work With Users List
Top Menu
Top menu contains these options:

| Option | Function |
| Add a User | You can create new user. See Add New User. |
| Reassign Licenses | You can change or assign licenses to users. See Reassign Licenses. |
| Refresh | The list of users will be refreshed, for example, when another user with administrator permissions made some changes (add or edit user), you will see them after the refresh. |
| Reset Password | You can change the password for the selected user(s). See Reset Password. |
| Force Password Change | Selected users will be forced to change their passwords after the next login. See Force Password Change. |
| Effective Permissions | Add selected user(s) to specific group(s). See Add to Groups. |
| Delegate | You can delegate the agenda of the selected user(s) to another user. See Delegate Agenda. |
| Assign to Groups | You can check what permissions are applied to a user. See Effective Permissions. |
| Deactivate | Selected user(s) will be deactivated and unable to use eWay-CRM. See Deactivate or Re-activate the User. |
| Search | You can easily search through displayed columns in the list. You will see only those result that contains the search string. |
| Filter | You can filter by predefined criteria. See Users Filtering. |
Users List
Users list has this design:

| Column | Description |
| Check Box | Click the user and you select him or her. Check box indicates that the user is selected. You can select more than one user at time. |
| Full Name | Full name of the user. |
| Username |
Username that is used to logged into account. Username can have specification next to it:
|
| Email address of the user. | |
| License | The license that is assigned to the user. |
| Last Login | Date and time of last user's login. |
| Last Activity | Date and time of last user's activity. |
Users Filtering
In the top menu of the list, you can filter users. Just click Filter and set whether you wan to show inactive users or show system users.

Add New User
If you want to add user, just click Add a User.

You will see the dialog for adding new user where you can insert these values in the first step:

| Field | Description |
| First Name | First name of the user. |
| Last Name | Last name of the user. |
| Username |
Specify the username - it is automatically created from the first letter of the first name and whole surname (e.g. John Smith is jsmith), but you can insert your own username. Username can be only 100 characters long. |
| Supervisor | Select user who is supervisor of the new user. |
| User's email address. It is very important for eWay-CRM system notifications. | |
| eWay-CRM License | Select license for the new user. For more information, go to Manage Subscriptions. |
| Password Settings | You can add password manually or generate some strong one randomly. |
| Force the user to change their password at first login | If it is marked, user must set his or her own password after first login to eWay-CRM. |
| Send installation instructions in email upon completion (contains password) | If it is marked, user will receive information email about creating his or her account. |
If you are satisfied with filled values, click Next.
The second step: Please mark all groups you want the user add in. You can use Search field.

If you marked all groups you want to relate with user, click Next.
The last step gives you these options to mark:
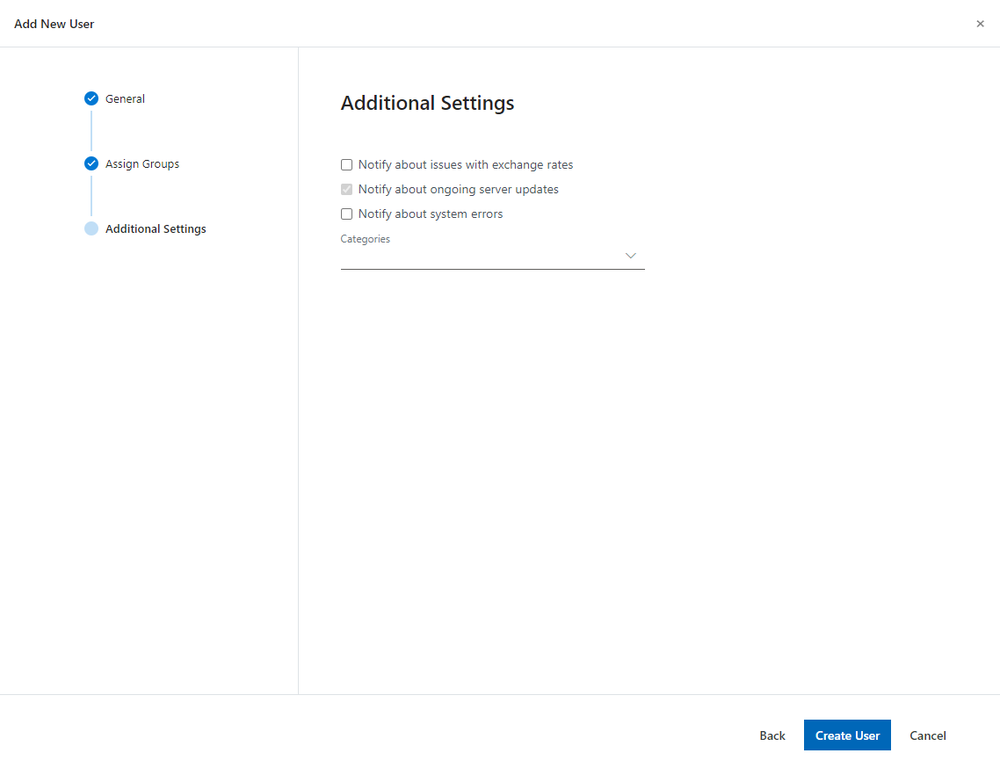
- Notify about issues with exchange rates - if marked, the user will receive notification about errors in exchange rates. (Requirement: The user is in the Administrator group.)
- Notify about ongoing server updates - if marked, the user will receive a notification about the update of the eWay-CRM web service.
- Notify about system errors - if marked, the user will receive a notification about system errors. (Requirement: The user is in the Administrator group.)
- Categories - you can add categories to your users so they can be easily sorted.
If you marked all you need, just click Create User to finish user creating. New user will be in the users list and if he or she has license, user can immediately login to his or her account.
Edit User
If you want to edit user, you need to doubli-click the user or move cursor over him or her and then click pencil icon:

Now, you can edit user as you want. In General tab, you can change name, username (not for system users), supervisor, email address or license.

In the Groups tab, you can add user to some other groups or select him or her from the group.

In the Additional Settings, you have other options of user settings:
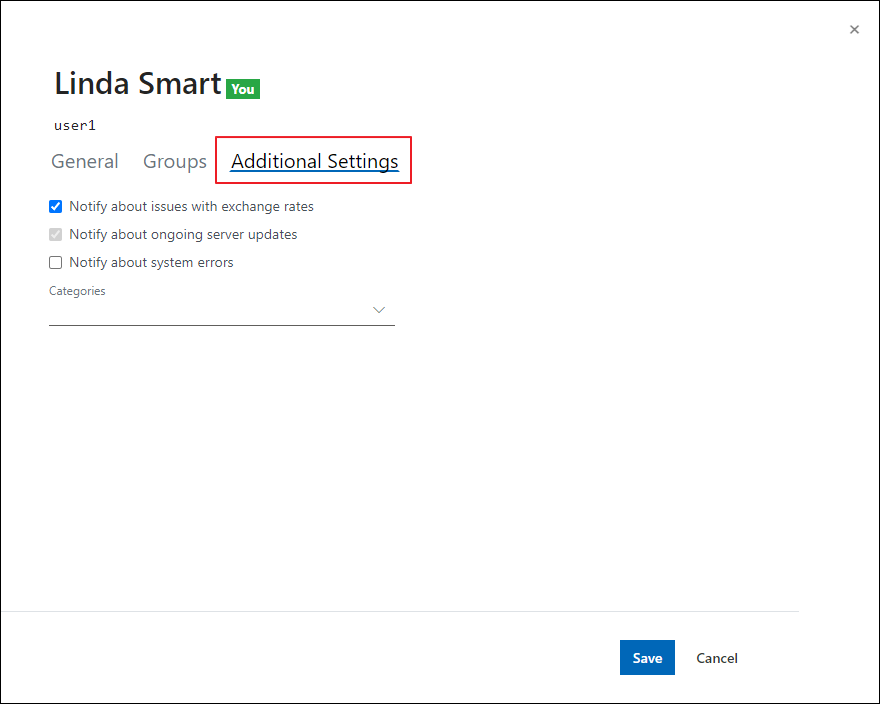
- Notify about issues with exchange rates - if marked, the user will receive a notification about errors in exchange rates. (Requirement: The user is in the Administrator group.)
- Notify about ongoing server updates - if marked, the user will receive a notification about the update of the eWay-CRM web service.
- Notify about system errors - if marked, the user will receive a notification about system errors. (Requirement: The user is NOT in the Administrator group.)
- Categories - you can add categories to your users so they can be easily sorted.
Confirm your changes by clicking Save.
Reassign Licenses
To manage licenses, just click Reassign Licenses.

There, you can see list of all users. License can be assigned only to those that are active:

| Column | Description |
| Full Name | Full name to identify the user. |
| Username | Username to identify the user. |
| Active | Mark if you want to make user active. Then, you can assign him or her license. |
| eWay-CRM License | Select license that you want to add to user. For more information, go to Manage Subscriptions. |
In the top part of the dialog, you can see what licenses you have and in what amount.

If you are done with license reassigning, confirm your changes by clicking OK.
When you confirm the dialog, the reassign of the license will proceed. You can see the change immediately in the Admin Center, but the eWay-CRM Desktop user needs to finish the synchronization to work with data related to the license.
Reset Password
Click one or more users to select them. If you select user(s), the Reset Password button becomes active:

Click Reset Password and you see dialog with selected users in the header:

You have these options in the dialog:
- Auto-generate Password - automatically generated a strong password.
- Let Me Create the Password - insert password manually.
- Force the user to change their password at first login - the user must set his or her own password after the first login to eWay-CRM.
- Send new password via email - the user will receive an information email about a new password.
If you are satisfied, confirm the dialog by clicking Reset.
Force Password Change
Click one or more users to select them. If you select user(s), the force Password Change button becomes active:

Click Force Password Change and you see dialog with selected users in the header:

Confirm the dialog. Selected users will be forced to change their password after the next login. These users (unless they changed their password) are marked as Password Change Forced in the Users list:

Add to Groups
Click one or more users to select them. If you select user(s), the Add to Groups button becomes active:

When you click Add to Groups, you will see list of groups that can be added to users. In the header, you see users that will be added to marked groups.

Just mark group(s) to add user(s) to it. If the list is long, you can use search function. Click Assign to confirm your choice.
Delegate Agenda
Delegate user's agenda to other employees, for example, when the user is leaving to maternity leave o he or she is ending in your company.
Click one or more users to select them. If you select user(s), the Delegate button becomes active:

If you click Delegate, you have these options in the dialog:
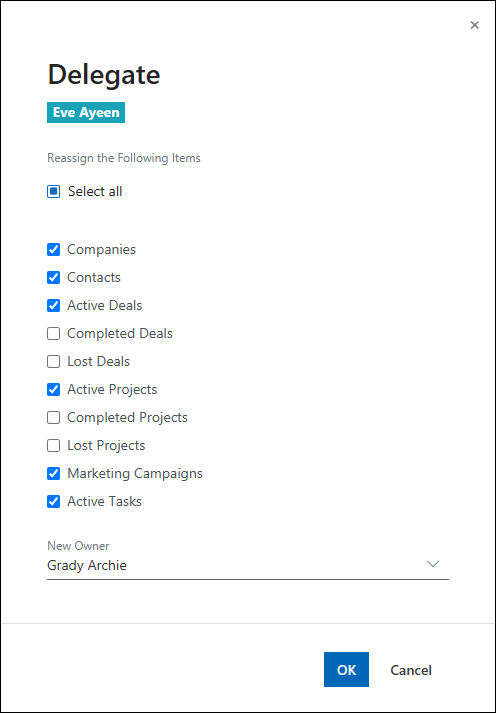
- Reassign the Following Items - select what items will be delegated to a new owner.
- New Owner - select a user to who the agenda will be delegated.
To confirm the delegation, click OK. The agenda you selected will be delegated to a new user who becomes the new owner of all selected items.
Effective Permissions
Click one user to select him or her. If you select user, the Effective Permissions button becomes active:

If you click it, you will see all effective permissions that are set for the user - in the first tab, you can see module permissions, in the second tab are fields permissions.

You can see set permissions at first sight, but when you move the mouse over some circle, you will see due to what group is the permissions set (the example is for module permissions, but it is similar for fields permissions):

In the right part of the dialog, you can see the Quickly Assign Groups section where you can add the user to any group or remove him or her from it.

Deactivate or Re-activate the User
User in eWay-CRM cannot be deleted, only deactivated.
Click one or more users to select them. If you select user(s), the Deactivate button becomes active (but none of the users cannot be system):

If you click Deactivate, you will see a similar dialog as in the Delegate option - see above. Set whether you want to delegate the agenda of a deactivated user to another user.

Confirm your choice by clicking OK.
If you want to activate the user again, just click him - Activate option is enabled.

After clicking Activate, just select the license you want to relate to the user.

Unlock Account
Number of Unsuccessful Attempts to Enter Password Before Account Is Locked setting specifies how many times in a row user can write his or her password incorrectly before the account is locked. If someone unauthorized will try to guess a password, this is your safety setting.
Important: When the account is blocked, data is not synchronized with the server.
Account Lock Duration in Minutes sets for how many minutes the account will be locked. The administrator can set minutes (the account will be automatically unlocked after a set period) or the administrator can set 0 - this means that the account will not be automatically unlocked. Only the administrator can unlock the account in this case.
The administrator has the possibility to unlock the account in Administration Center in the Users section. The Unlock button will appear when the locked user is clicked and selected:

If you click the Unlock button, the user's account will be unlocked and it will synchronize data. You should unlock the account only in case you know that blocking was done by mistake, not for a purpose.
