Integration With Microsoft SharePoint
If the Documents module system, which is standard in eWay-CRM, is not sufficient for you, there is an option to use integration with the SharePoint system, where folders are automatically created in your SharePoint, which you can access via links in the items of companies, deals, or projects.
You can easily access a folder associated with a company, deal, or project, and thus access the documents you need at any given moment. You then work with these documents in SharePoint—editing, saving, etc.
Content
- How It Works
- Requirements
- Generating a Certificate Using Git
- Integration Process
- Configuration Settings
How It Works
When a Company, Project, or Deal is created in eWay-CRM, a folder is created in a selected directory in SharePoint. A link to this folder has been added to a custom field for the corresponding item in eWay-CRM.
Folders can be organized by years and months when the given item was created, to make the structure in SharePoint clearer.
Requirements
Microsoft SharePoint integration has the same requirements as the eWay-CRM server component.
It is necessary to have a Microsoft 365 account, and thus access to SharePoint and Azure.
You need to have these eWay-CRM licenses to be able to run the integration (for more information, see Compare Plans article):
- Contacts & Companies (Lite) for company folders
- Sales (Lite) for deal folders
- Projects (Lite) for project folders
To deploy the integration, it is necessary to contact eWay-CRM technical support.
Generating a Certificate Using Git
- Install Git (in CMD, use the command
winget install Git.Git), because Git also installs OpenSSL. Note that WinGet is officially supported on Windows 10 (version 1809 and newer) and Windows 11. - Run Git Bash.
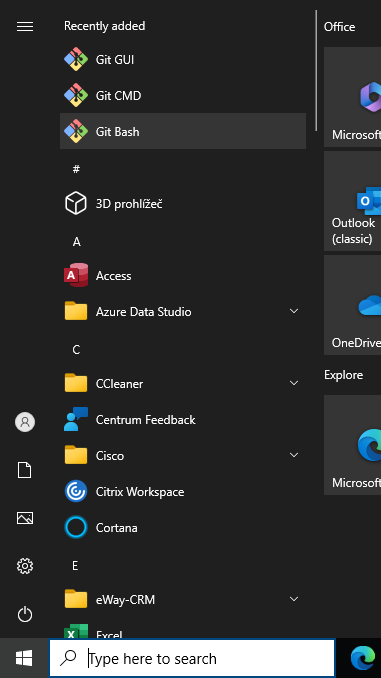
- In Git Bash, run OpenSSL and generate a CRT certificate:
openssl req -x509 -newkey rsa:4096 -sha1 -days 365 -nodes -keyout key.pem -out SharePointcertificate.crt

In the header, you will see the path where the certificate is created; in this case, it is the folder C:\Users\dcoufal.
- Generate a PFX file from the CRT certificate:
openssl pkcs12 -export -in SharePointcertificate.crt -inkey key.pem -out SharePointCertificate.pfx -password pass:{pfx_file_password}
where you replace {pfx_file_password} with the password for the certificate. The PFX file must be named SharePointCertificate.pfx.
Integration Process
-
If you already have a certificate generated from the above process, you can proceed with the following steps.
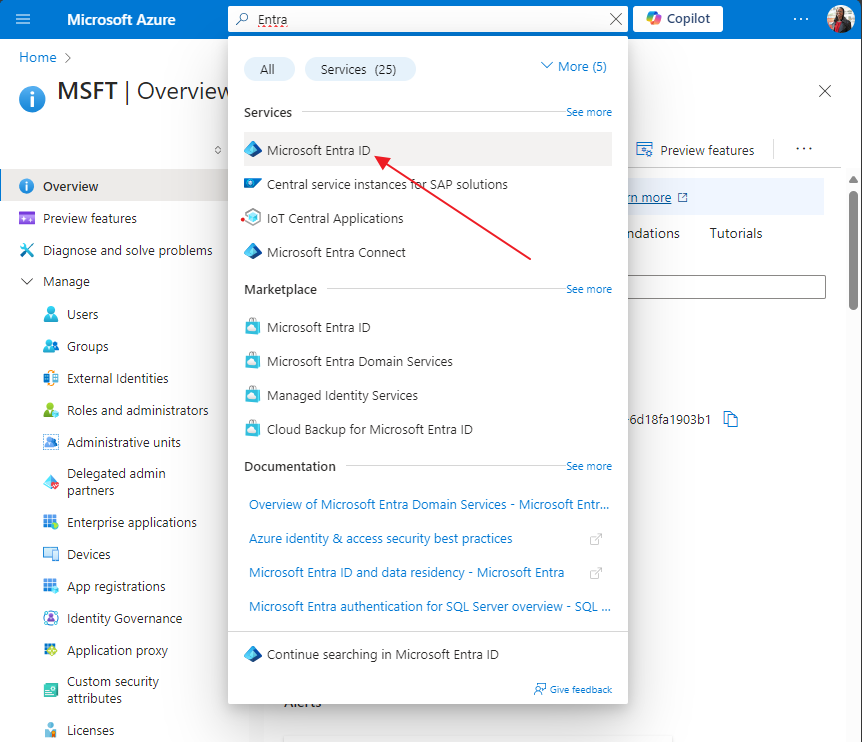
- In Azure (https://portal.azure.com/), open the Microsoft Entra ID application.
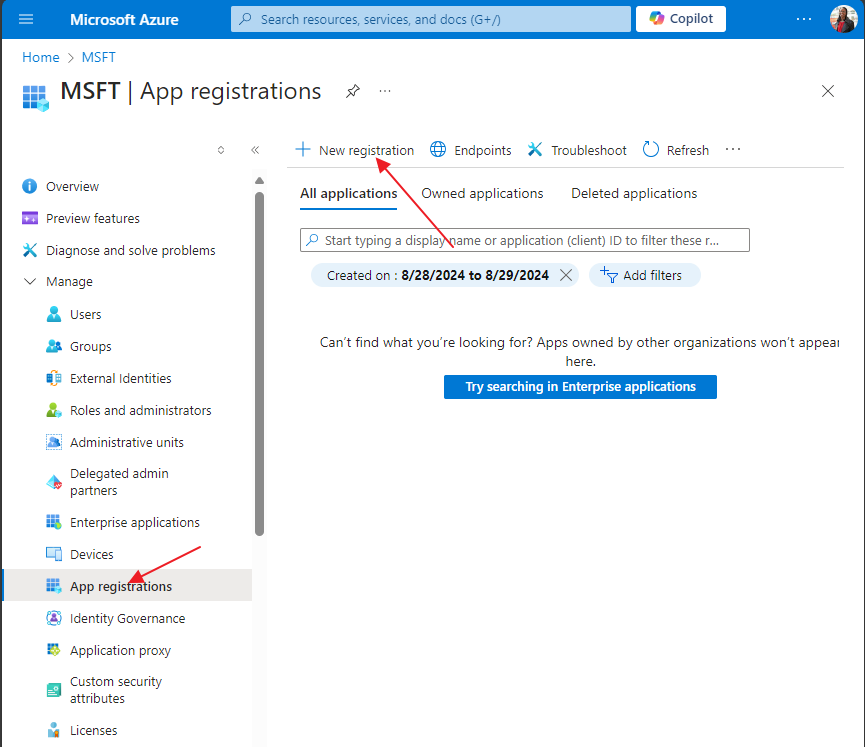
- In the left menu, select the App registrations tab. Click New registration at the top.
- A form will open where you only need to fill in the name of the application. It is necessary to choose that the application is Single tenant. After filling it out, confirm the registration by clicking the Register button.
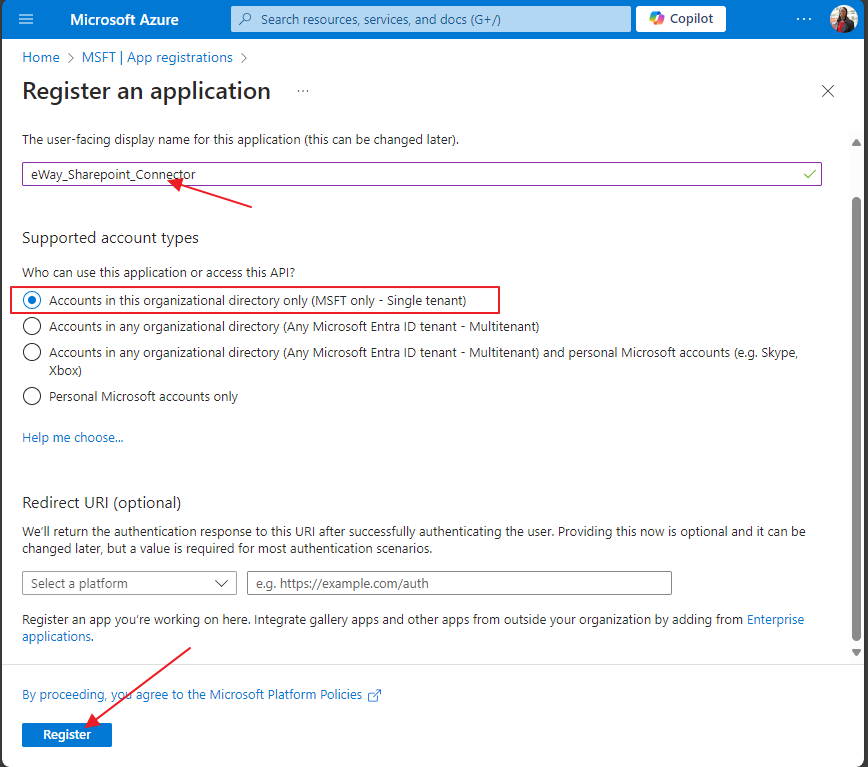
- After completing the application registration, the application details should open, or you can navigate to them again from the App registrations tab.
- In the application details, switch to the Certificates & secrets tab in the left panel and select the "Certificates" tab, where you should see the "Upload certificate" button.
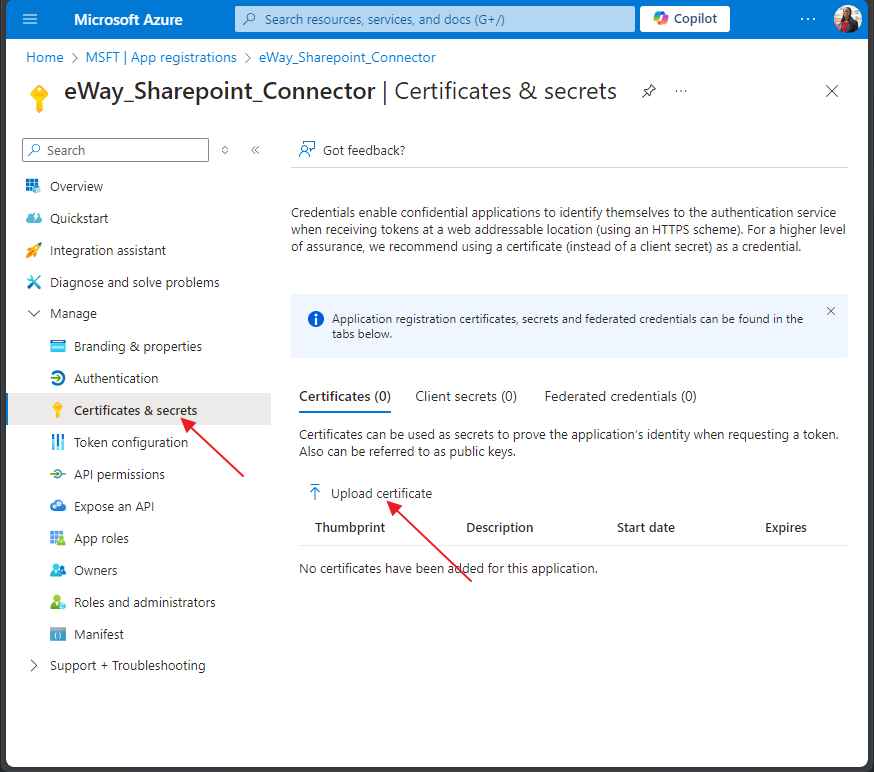
- After clicking the button, a form will appear where you need to upload the .CRT certificate.
- Finally, grant the application access rights to the SharePoint API, which is done again in the application details in the API permissions tab from the left menu using the Add a permission button.
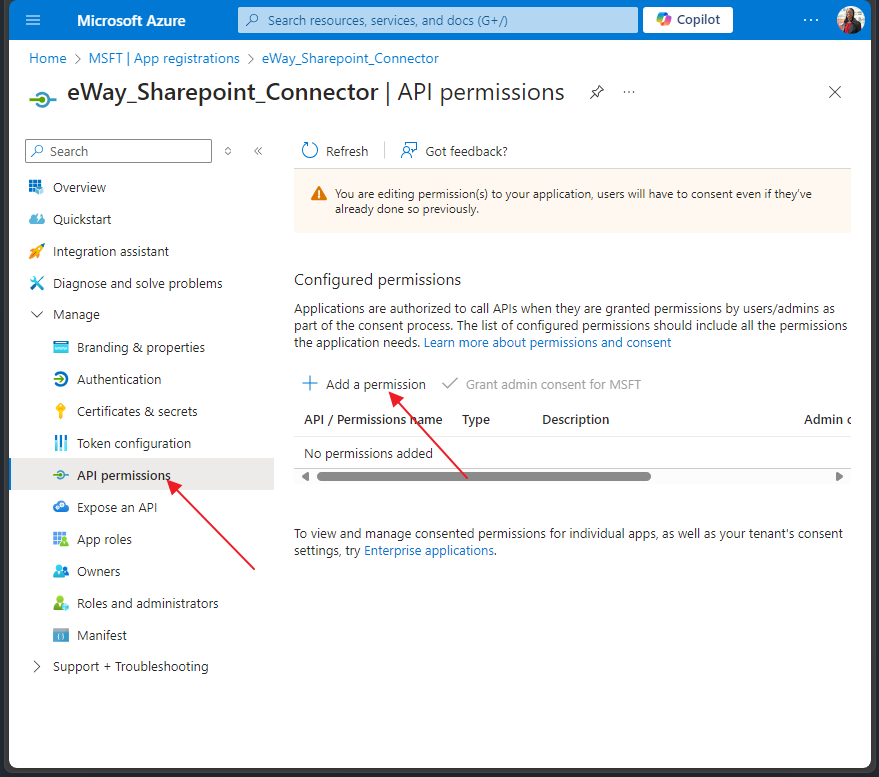
- After clicking Add a permission, a menu will open where you find SharePoint and select Application permissions. Within these permissions, choose Sites.ReadWrite.All and then save it by clicking Add permissions.
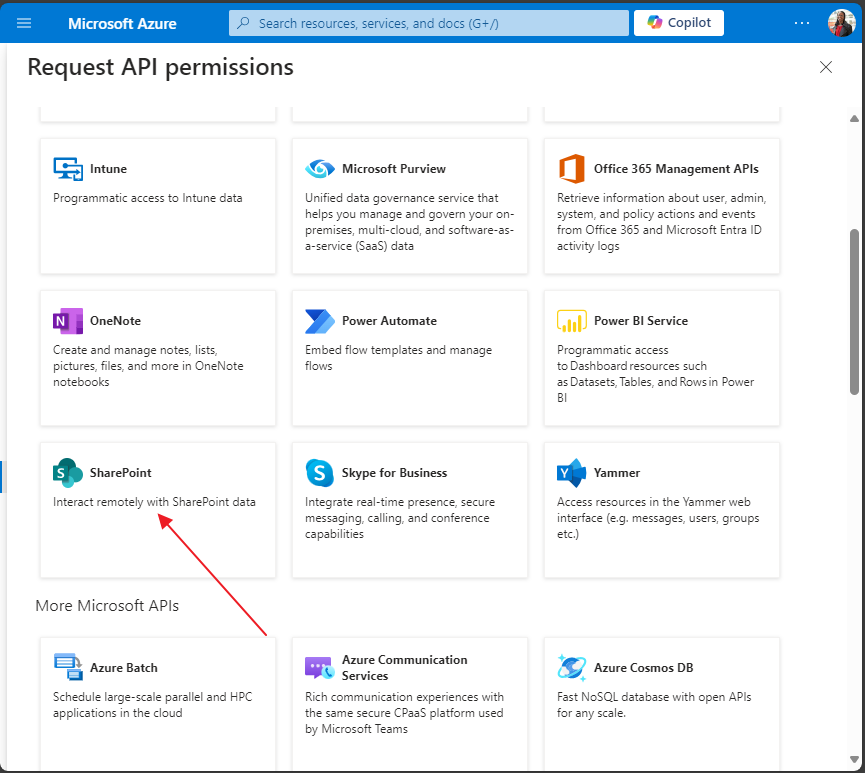
- Lastly, the rights in the API permissions tab must be approved by an administrator to be marked as Granted.

- In the eWay-CRM Administration Center, create new custom fields of type Link - URL in the Companies, Projects, and Deals modules. These fields will be used to store links to the generated SharePoint folders. The field needs to be in the form of the given module in order for you to see it each time you open the item detail.
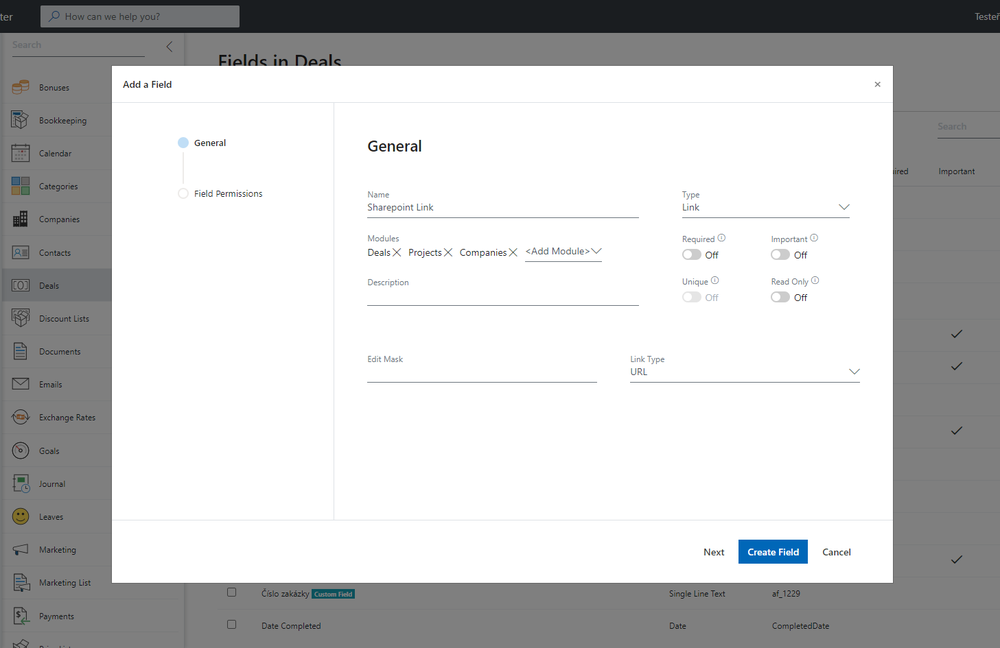
- eWay-CRM technical support must perform the following steps: Download the connector and fill in the configuration file for the connector (see below).
- Upload the connector and the previously generated .pfx certificate (
SharePointCertificate.pfx) to the client’s directoryApps\SharePointConnector. If this folder does not exist, it needs to be created and must be namedSharePointConnector. - In eWay-CRM, it is necessary to create an API user who will have permissions for the modules Companies, Deals, and Projects. The minimum permissions include the ability to view and edit these modules, as well as the custom fields that were created for the connectors.
- Upload the connector’s launch file
SharePointTriggers.xmlto theTriggers\web service directory. In theSharePointTriggers.xmlfile, you need to correctly enter the API user’s username everywhere, which is used for the connection to SharePoint (the same user as in the configuration file - see description below):<AccessToken ApiUser="username" />
Configuration Settings
The application supports the following configuration values in SharePointConnector.exe.config:
<generalConfig
    rootDocumentsFolder=""                   - if the root folder is different from "Shared Documents," its name will be inserted
    certPfxFilePassword=""                   - it is the same password ({pfx_file_password}) you created in the last step while creating a certificate
    tenantName=""                            - the first subdomain of the SharePoint URL; in the case of domain123.sharepoint.com, it would be domain123
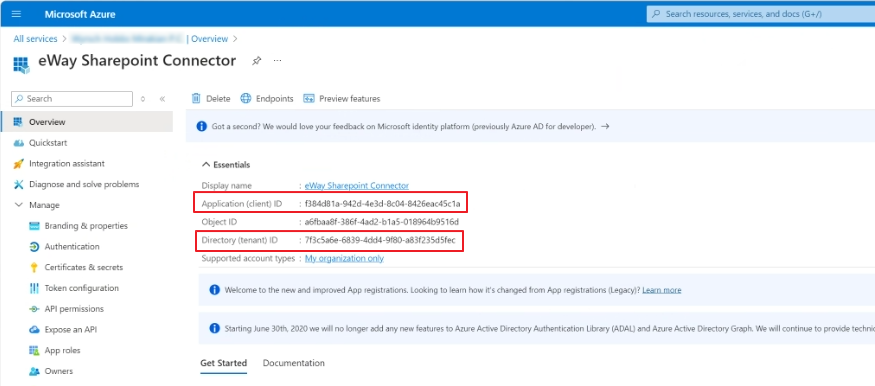
    tenantId=""                              - to be found in Azure, see the image below
    appId=""                                 - to be found in Azure, see the image below
    language="en"                            - language setting for correct folder storage; supported values are en, cs, sk; if the value is left empty, it is same as en
    companyFolder=""                         - URL address of the folder in SharePoint where new folders for the company should be created. The folder needs to be created manually in the shared SharePoint folder.
    projectFolder=""                         - URL address of the folder in SharePoint where new folders for the project should be created. The folder needs to be created manually in the shared SharePoint folder.
    leadFolder=""                            - URL address of the folder in SharePoint where new folders for the deal should be created. The folder needs to be created manually in the shared SharePoint folder.
    sortMode=""                              - Specifies whether to create a folder structure by year, year and month or none (available values: Year, YearMonth, None). The structure uses the month/year of the link creation, not the item creation.
    companySharepointFolderNameTemplate=""   - Company folder name; supported values are $FileAs$ (company name), $ID$ (company number), and $ItemGUID$ (company database ID); usage example: $FileAs$
    projectSharepointFolderNameTemplate=""   - Project folder name; supported values are $FileAs$ (project name), $HID$ (project number), and $ItemGUID$ (project database ID); usage example: $FileAs$ - $ItemGUID$
    leadSharepointFolderNameTemplate=""      - Deal folder name; supported values are $FileAs$ (deal name), $HID$ (deal number), and $ItemGUID$ (deal database ID); usage example: $FileAs$ - $HID$
    leadTemplateFolder=""                    - Folder address from which the folders and files that are common to all created deals should be automatically copied
    projectTemplateFolder=""                 - Folder address from which the folders and files that are common to all created projects should be automatically copied
    companyTemplateFolder=""                 - Folder address from which the folders and files that are common to all created companies should be automatically copied
/>
<eWayCRMConnection
    url=""                                   - URL of the eWay-CRM web service
    userName=""                              - API user’s username in eWay-CRM
    companyUrlField=""                       - Database name of the custom field for the link to the company folder
    projectUrlField=""                       - Database name of the custom field for the link to the project folder
    leadUrlField=""                          - Database name of the custom field for the link to the deal folder
    companyDisableSharePointField=""         - Database name of the custom field which, when checked, will prevent the SharePoint folder from being created for the given company
    projectcDisableSharePointField=""        - Database name of the custom field which, when checked, will prevent the SharePoint folder from being created for the given project
    leadDisableSharePointField=""            - Database name of the custom field which, when checked, will prevent the SharePoint folder from being created for the given deal
/>
If a folder is created based on the name of a deal, project, or company, any invalid characters will be automatically omitted from the folder name. These characters are: " * : < > ? / \ |.
In the Overview section in Azure, both the tenantId (Directory (tenant) ID) and appId (Application (client) ID) can be found.
