IMAP: How to Properly Adjust MS Outlook
If you're using IMAP for synchronization between your inbox and Outlook, we recommend (apart from the basic settings which are listed by providers on their web pages) that you configure other properties of Outlook. Let’s take a look at which you should configure.
The procedure for editing may be little different in the various versions of MS Outlook:
- Microsoft Outlook 2019
- Microsoft Outlook 2013 and 2016
- Microsoft Outlook 2010
- Microsoft Outlook 2003 and 2007
Keep Your MS Outlook Up to Date (Older Versions of Microsoft Outlook)
Before you start configuring, check your MS Outlook to ensure you have the latest updates. A non-updated system can cause miscommunication with the IMAP protocol.
If you want to check the version of your system, on the Outlook toolbar, select Help → About application MS Outlook or File → Help → About application MS Outlook.
In a new window, you will be shown detailed information and in the upper part there will be data about updates (see picture below). List of last updates and manual to install them can be found on Microsoft web.
If your system doesn't contain the latest Service pack, first of all update your Outlook. You can update your computer via the Windows Update service.

Microsoft Outlook 2019
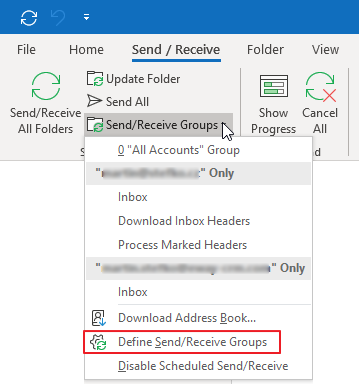
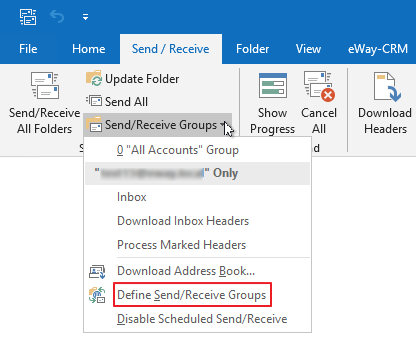
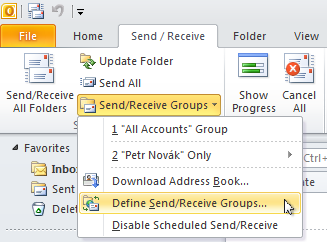
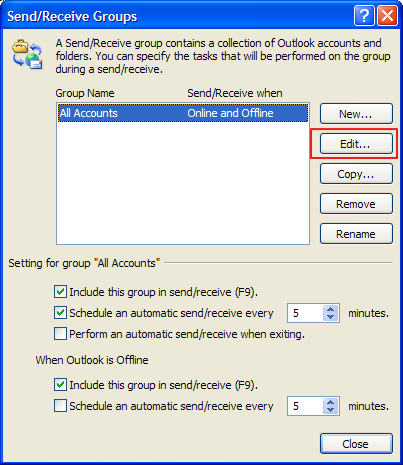
- In Microsoft Outlook, go to Send/Receive tab and select Send/Receive Groups > Define Send/Receive Groups.
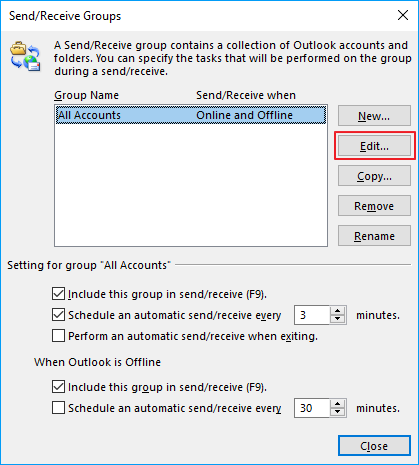
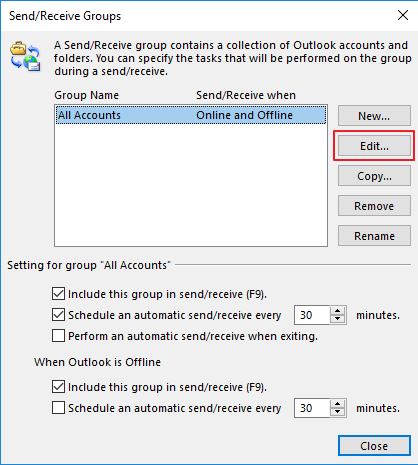
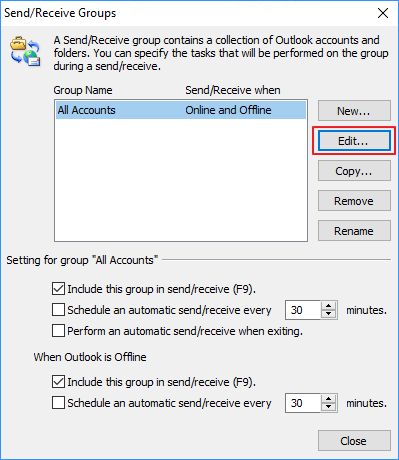
- In the next window, select the group All Accounts and click the Edit button to edit.
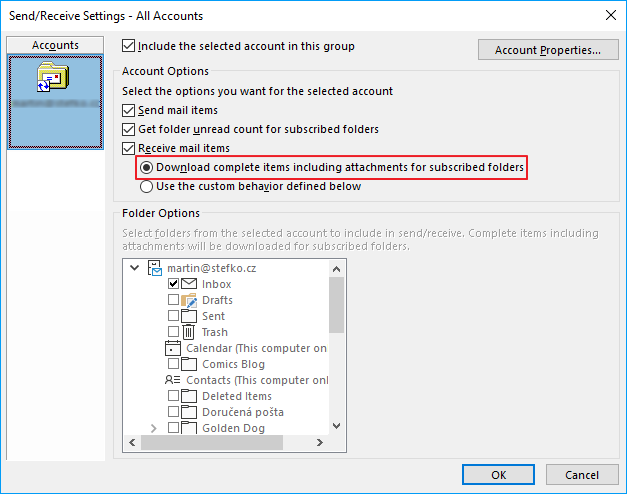
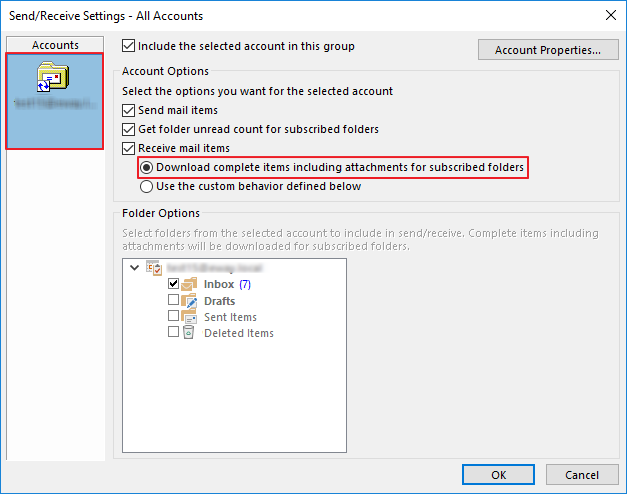
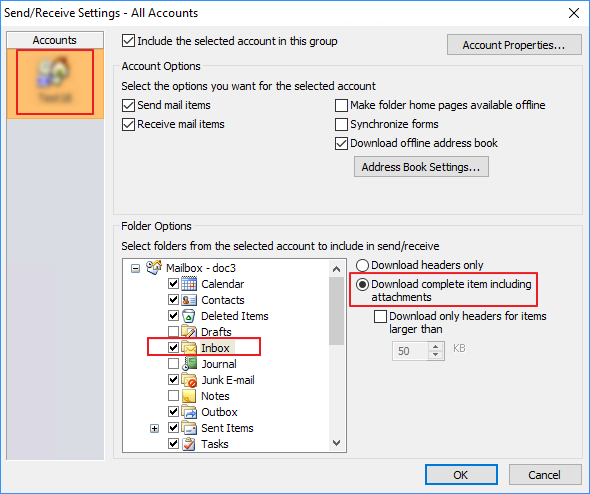
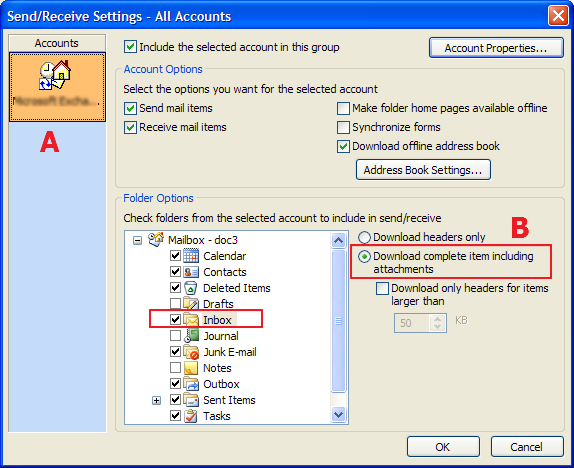
- Choose the relevant account in the left column , which cooperates with the IMAP protocol. In this case, there is only one account to select, but if you have mapped more email boxes to Outlook, you will have to select the correct one. Then, it is important to mark Download complete item including attachments for subscribed folders, this has to be valid at least for the Inbox folder. Confirm it by clicking OK.
- After previous steps, go to the account settings and select Change...
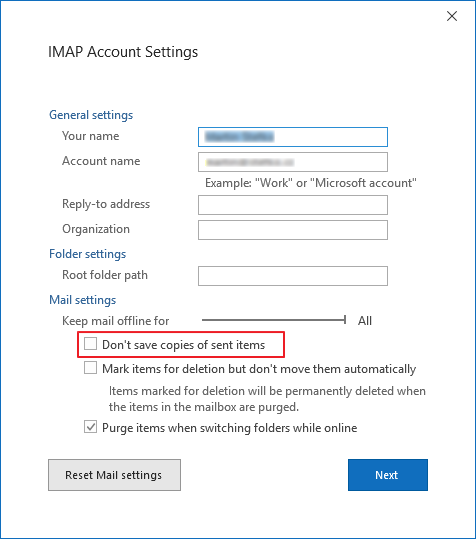
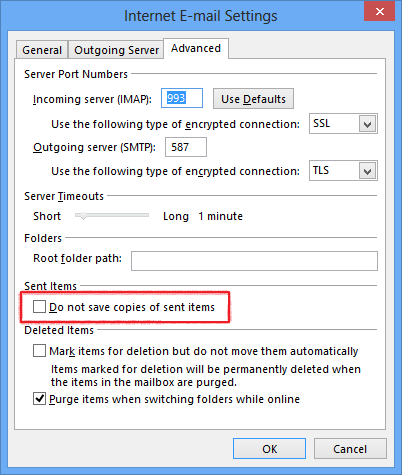
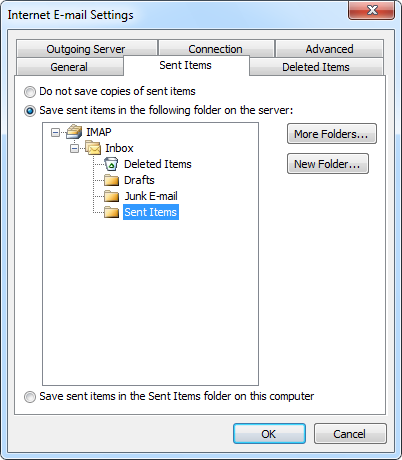
- Be sure that you have not marked the Don't save copies of sent items. If it is marked, unmark it. You will ensure the correct function of the emails tracking.
Microsoft Outlook 2013 and 2016
- In Microsoft Outlook, go to Send/Receive tab and select Send/Receive Groups > Define Send/Receive Groups.
- In the next window, select the group All Accounts and click the Edit button to edit.
- Choose the relevant account in the left column , which cooperates with the IMAP protocol. In this case, there is only one account to select, but if you have mapped more email boxes to Outlook, you will have to select the correct one. Then, it is important to mark Download complete item including attachments for subscribed folders, this has to be valid at least for the Inbox folder. Confirm it by clicking OK.
- After previous steps, go to the account settings and select Change... and then go to More Settings...
- In the Advanced tab, be sure that you have not marked the Do not save copies of sent items. If it is marked, unmark it. You will ensure the correct function of the emails tracking.
Microsoft Outlook 2010
- In the Outlook menu select Send/Receive Groups > Define Send/Receive Groups
- In the next window, select the group All Accounts and click the Edit button to edit.
- Choose the relevant account in the left column, which cooperates with the IMAP protocol. In this case, there is only one account to select, but if you have mapped more email boxes to Outlook, you will have to select the correct one. In the right column of the window specify the settings as shown in the picture. It is important to mark Download complete item including attachments, this has to be valid at least for the Inbox folder.
- Be sure that you have correctly set a folder for sent items. Go to the account settings and select Change... and then go to More Settings...
- In the Sent Items tab, mark the Save sent items in the following folder on the server option. As a folder, select the default folder for sent emails, in this case Sent Items.
Microsoft Outlook 2003 and 2007
- In the Outlook menu select Tools > Send/Receive > Send/Receive Settings > Define Send/Receive groups

- In the next window, select the group All Accounts and click the Edit button to edit.
- Choose the relevant account in the left column (marked with letter A), which cooperates with the IMAP protocol. In this case, there is only one account to select, but if you have mapped more email boxes to Outlook, you will have to select the correct one. In the right column of the window (B) specify the settings as shown in the picture. It is important to mark Download complete item including attachments, this has to be valid at least for the Inbox folder.
- Accept the settings changes by clicking OK then restart Outlook.